


Administration Guide 125
Connecting from a Private Computer
To view the Connection Log
The Connection Log contains real-time connection information that is particularly useful for trouble-
shooting connection issues.
1 Right-click the Firebox SSL Secure Access Client icon in the notification area.
2 Choose Connection Log from the menu.
The Connection Log for the session appears.
Note
The Connection Log is written to the computer in %systemroot\Documents and
Settings\username\Local Settings\Application Data\NET6\net6vpn.log. The log is overwritten each time
a new VPN connection is established.
To disconnect the Secure Access Client
Right-click the Secure Access Client icon in the notification area and choose Disconnect from the
menu.
Note
When you share an application, instead of your desktop, the person with whom you are sharing the
application can view and work with only that application. The rest of your desktop is not visible to the
other person.
Configuring Proxy Servers for the Secure Access Client
When the Secure Access Client connects, before downloading polices from the Firebox SSL VPN Gate-
way, the Secure Access Client queries the operating system for client proxy settings. If auto-detection is
enabled, the Secure Access Client automatically changes client proxy settings to match settings stored
in the operating system. The Secure Access Client attempts to connect to the Firebox SSL VPN Gateway,
download pre-authentication policies, and then prompt the users for their logon credentials. If the
Secure Access Client cannot automatically detect the client proxy settings, it resorts to a straight con-
nection without using the proxy server. Automatic detection of the proxy settings is configured in the
Advanced Options dialog box in the Secure Access Client.
Users can also manually configure a proxy server from the Secure Access Client. When a proxy server is
manually configured, this disables the automatic detection of proxy settings.
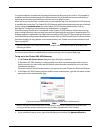
To manually configure a proxy server
1 On the desktop of the client computer, click the Secure Access Client icon to open the logon dialog box.
2 Right-click anywhere in the Secure Access Client logon dialog box and select Advanced Options.
3 In the WatchGuard Secure Access Options dialog box, under Proxy settings, select Manually
configure proxy server.
4 In IP Address and Port, type the IP address and port number.
5 If authentication is required by the server, select Proxy server requires authentication.
The Advanced Options dialog box can also be opened by right-clicking the WatchGuard Secure Access
icon on the desktop and then clicking Properties.