


VISTA-10SE Installation and Setup Guide
15–6
✱
58 Expert Programming Mode Procedures
Enter the Program mode and follow the step-by-step instructions below.
NOTE: Before proceeding, you must program field
✱
22 (RF System) as required.
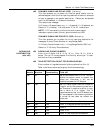
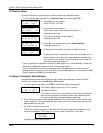
SET TO CONFIRM?
0 = NO 1 = YES 0
Press
✱
58. This display appears upon entry into this mode.
The default is 0 (No).
If you enter 1 (Yes), you are prompted to confirm each transmitter
after entering the serial and loop numbers (see “XMIT TO
CONFIRM” prompt on a following page). We recommend that you
confirm the programming of every transmitter.
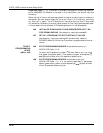
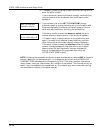
Zn
ZT RC In: L
01 09
10 HW: 1
A summary screen appears, showing zone 01’s current
programming or default values.
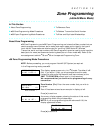
ZN ZT RC IN: L
10 – – – : –
Enter the first digit of the zone number to be programmed. In the
example at the left, where zone 10 is to be programmed, the first
digit 1 is entered, followed by the 2nd digit 0. The display includes
dashes, as shown at left. If zone 6 were to be programmed, you
would press the [0] key, then the [6] key. You must always
program zones using two digits.
Use the [D] key to enter wireless keys. When the [D] key is
pressed, a special prompt is displayed that offers a series of default
templates for wireless keys. Go to the paragraph on a following
page titled “To Enter and Duplicate Wireless Keys” for the
necessary procedure.
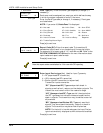
ZN ZT RC IN: L
10 00 10 RF: 1
†
If you enter HW
(hardwired), the next
screen is similar to the one
above, except that HW is
displayed under “In.”
A display with that zone’s current programming appears.
Press [
✱
] to continue.
Enter Zone Type (ZT), Report Code (RC), and Input Device
Type (In)
†
sequentially, but not the Loop No. (L).
Use the [A] (Advance) and [B] (Back) keys on the keypad to move
the cursor within the screen.
Use the [C] key to copy the previous zone's attributes.
Press [
✱
] if the existing information is acceptable. If not, you can
press the [#]
key to back up without saving.
10 INPUT S/N: L
AXXX-XXXX 1
If you entered RF, BR, or UR as the Input Device, a prompt for
Serial and Loop number is displayed, as shown at left.