


SCXG-SVX01B-EN 39
pre-startup
requirements
Installation
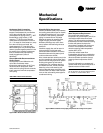
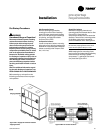
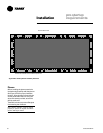
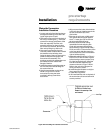
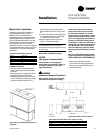
Figure I-PR-7. Installing the waterside economizer.
Waterside Economizer
Installation Procedure
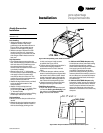
1. Loosen and pull all end devices that go
throught the bushing on the filter rack
(upper right corner of rack).
2. Remove the filter rack from the back of
the unit by removing the
1
/
4
” hex head
screws from the top and bottom of the
filter rack assembly. The filter rack
assembly will hang on the unit when
the screws are removed. Remove the
filter rack by lifting it up off the unit.
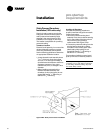
3. Remove the economizer from the
crate and position it behind the unit with
the headers on the left side, when
facing the back of the unit. Remove the
plastic envelope that is taped to the
economizer box assembly. This
envelope contains the gasket that must
be installed onto the vertical side
flanges of the box.
4. Install the pressure sensitive gasket to
the unit side of the vertical flange on
the economizer box.
5. Hang the economizer on the unit as
shown in Figure I-PR-7. Lift the
economizer by using the holes
provided in the top panel of the
economizer.
6. Align economizer holes with the holes
in the unit channel. Install screws in the
top (6x) and bottom (6x) of the
economizer.
7. Remove the unit’s rear middle panel
and unbraze the two copper pipes in
the 2
5
/
8
” water pipe. Do not remove
the pipe outlet blockoff panel.
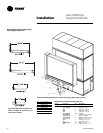
8. Remove the economizer tubing
assemblies from the shipping box.
Check ship-separate parts against
those shown in Figures I-PR-8, I-PR-9, I-
PR-10, and I-PR-11. Face the front of the
unit to see which side the water pipe
exits to determine if the unit has either
right or left-hand piping.
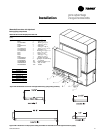
9. Assemble tubing as shown in Figure I-
PR-8 or I-PR-11. Tack all tubes in place
before brazing to ensure proper fit-up.
For right-hand piped units, install the
ball valve actuator assembly and
actuator as shown in Figure I-PR-10.
Refer to the unit wiring diagram for
wiring connection points.
10. Install the pipe insulation on all pipe
line to prevent sweating
11. Install the rear panels.
12. Re-install the filter rack on the back of
the economizer coil box and affix with
screws provided.