


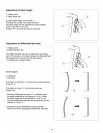
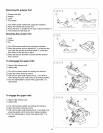


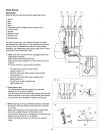
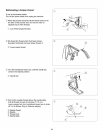

Adjustment of needle plate setting knob
(Changing to standard serging or rolled
hemming)
Chaining finger
Guide line
Cutting width adjusting dial
Needle plate setting knob
Upper knife
The needle plate setting knob is connected with the
chaining finger.
The chaining finger will slide to the right side of the needle
position when you set the needle plate setting knob at
"S" or "R".
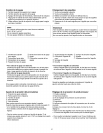
Turn off the power switch and unplug the machine.
Open the looper and side covers.
Disengage the upper knife (refer to page 18).
Push the cutting width adjusting dial to right as far as it
wilt go, then move the needle plate setting knob to
guide line of S (for Standard Serging) or R (for Rolled
Hemming). Release the cutting width adjusting dial to
the left gently.
Close the looper and side covers.
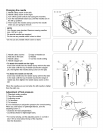
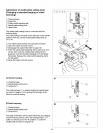
®
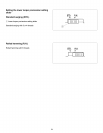
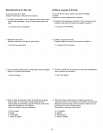
® Standard serging
Chaining finger
Needle plate setting knob
Guide line S
The chaining finger _ is located beside the needle plate
as shown in diagram @ for guiding the fiat edge of the
fabric for overlock sewing.
\
l®
®
® Rolled hemming
Chaining finger
Needle plate setting knob
Guide line R
The edge of the fabric will be rolled hemming, picot edging,
narrow hemming sewing, when the chaining finger _ is
pulled out toward you to the "R" position _ under the
needle plate as shown in diagram _.
22