8
Installation/Set up
Viewing • Listening
and Operation
Recording
Setting up
Others
Installing a Lens/Connecting to a Video Monitor
Installing a Lens
You can install a CS mount lens on the camera.
Important
●
When using a lens that weighs 400g or more including a zoom lens, make sure the lens
is supported as well as the camera in order not to cause damage due to overloading.
Connecting to a Video Monitor
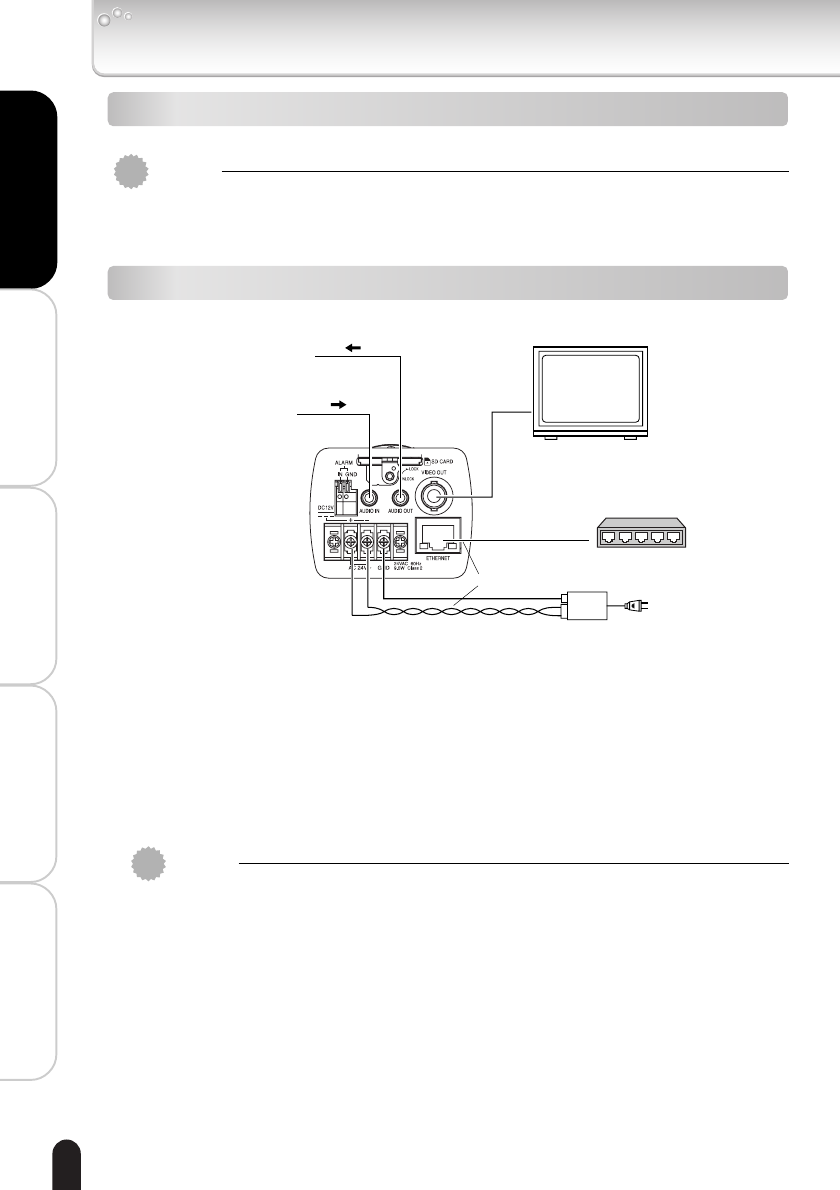
You can view camera images on the video monitor. The camera also supports audio.
Important
●
Power plugs of connected equipment must be disconnected before installation.
●
A 75-ohm coaxial cable (3C-2V or 5C-2V) is required for standard connection.
●
For details of wiring and operation of equipment to be connected, refer to their
operation manuals.
●
Lenses, coaxial cables for video signals, LAN cable and the power cord are not
supplied with the camera.
●
Do not connect AC24V and DC12V at the same time. It may cause a malfunction of
the camera or AC adapter.
●
Use a 4 pair twisted cable for the LAN cable to connect the camera to a PoE
compatible hub.
●
Use IEEE802.3af-compliant PoE devices.
●
An AC adapter is not supplied with the network camera. When using an AC adapter,
a 10 watt or greater AC adapter is required.
●
The camera takes about 30 seconds to start after the power is turned on.
Rear
AC24V
or DC12V
Video Monitor
7
On the power supply, use a PoE compatible hub, or connect
AC24V or DC12V power plug.
7
If power is to be supplied from a PoE compatible hub, etc., switch the
POWER SELECT switch to PoE.
7
If an AC24V or DC12V power supply is to be connected, switch the
POWER SELECT switch to AC24V/DC12V.
Connect a microphone
to input the audio.
Connect an audio output
device to output the audio.
PoE (IEEE802.3af)
compatible hub, etc.
LAN cable
Either
■About Audio Input/Output
Use a microphone with plug-in power operation and a 3.5 mm monaural mini jack for
the AUDIO IN. Use a speaker with a built-in amplifier and a 3.5 mm monaural mini
jack for the AUDIO OUT.
IK-WB02-07-24 2004.10.22, 15:358


