


9
Access Compressor Or Other Internal Cabinet Components
NOTE: It is not necessary to remove the top cover to gain access.
Removing the top cover may cause grill panels, corner posts,
louvers or coils to be damaged. It is recommended to protect the
top cover from damage of tools, belt buckles, etc. while servicing
from the top.
1. Should the unit height allow components to be accessed
from the top of the unit, follow procedures for removing fan
motor assembly. Access components through the top cap.
2. Large components may not be removed easily without
having access from the top and side. Side access may allow
procedures such as brazing, cutting, and removal easier.
Follow procedures below:
a. Follow procedures to remove the fan motor assembly.
b. Airconditioning unitsonly,removethe screwsfrom thetop
of the electrical control panel. (Heat pumps will not have
screws holding the electrical control panelin place atthe top
once the control box cover has been removed.)
c. Remove the base pan screws holding the control panel and
lift off the unit.
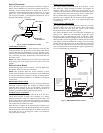
Certain maintenance routines and repairs require removal of
cabinet panels.
Remove Top Cover -- Mid--Tier /
Deluxe
1. Turn off all power to outdoor and indoor units.
2. Remove access panel.
3. Remove information plate.
4. Disconnect fan motor wires and cut wire ties. Remove wires
from control box. Refer to unit wiring label.
5. Remove screws holding top cover to louver panels.
6. Lift top cover from unit.
7. Reverse sequence for reassembly.
Remove Fan MotorAssembly -- Mid--Tier /
Deluxe
1. Perform items 1 through 6 from above.
2. Remove nuts securing fan motor to top cover.
3. Remove motor and fan blade assembly.
4. Reverse sequence for reassembly.
5. Prior to applying power, check that fan rotates freely.
Control Box Cover—Legacy RNC
Products
This panel contains much of the same information as the
information plate mentioned previously, but is designed only to
cover the control box.
Remove Top Cover—Legacy RNC
Products
1. Turn off all power to outdoor an indoor units.
2. Remove 5 screws holding top cover to coil grille and coil
tube sheet.
3. Remove 2 screws holding control box cover.
4. Remove 2 screws holding information plate.
5. Disconnect fan motor wires, cut any wire ties, and move
wires out of control box and through tube clamp on back of
control box.
6. Lift top cover from unit.
7. Reverse sequence for reassembly.
Remove Fan Motor Assembly—Legacy RNC
Products
1. Perform items 1, 3, 4, and 5 above. (Note: item 2 is not
required.)
2. Remove 4 screws holding wire basket to top cover.
3. Lift wire basket from unit.
4. Remove nuts holding fan motor to wire basket.
5. Remove motor and fan blade assembly.
6. Pull wires through wire raceway to change motor.
7. Reverse sequence for reassembly.
8. Prior to applying power, check that fan rotates freely.