


– 171 –
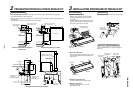
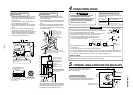
Tightening connection
CAUTION
• Do not apply excessive torque. Otherwise, the
nut may crack depending on the conditions.
(Unit : N•m)
• Tightening torque of flare pipe connections
Pressure of R410A is higher than that of R22.
(Approx. 1.6 times) Therefore, using a torque
wrench, tighten the flare pipe connecting sections
which connect the indoor and outdoor units of the
specified tightening torque.
Incorrect connections may cause not only a gas
leak, but also a trouble of the refrigeration cycle.
Align the centers of the connecting pipes and tighten
the flare nut as far as possible with your fingers.
Then tighten the nut with a spanner and torque wrench
as shown in the figure.
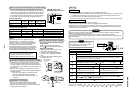
Thermal insulating process
Apply thermal insulation to pipes at liquid and gas
sides separately.
• Be sure to use thermal insulator with heat resisting
temperature 120˚C or more for pipes at gas side.
• Using thermal insulators attached to the indoor unit
and Elbow piping kit, apply thermal insulating
process surely to pipe connecting section without
clearance.
CAUTION
Apply thermal insulating process surely so
that no exposure cannot be found up to the
end of the pipe connecting section of the
indoor unit. (If a part of the pipe is exposed,
leakage may be caused.)
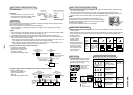
Outer diam. of copper pipe
6.4 mm (diam.)
9.5 mm (diam.)
12.7 mm (diam.)
15.9 mm (diam.)
Tightening torque
14 to 18 (1.4 to 1.8 kgf•m)
33 to 42 (3.3 to 4.2 kgf•m)
50 to 62 (5.0 to 6.2 kgf•m)
68 to 82 (6.8 to 8.2 kgf•m)
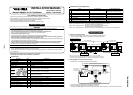
Flare at
indoor
unit side
Flare at
outdoor
unit side
Half union
Flare nut
Externally
threaded side
Internally
threaded side
Use a wrench to secure.
Use a torque wrench to tighten.
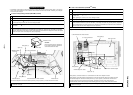
For the connection of refrigerant pipe and thermal
insulating process after hanging down the indoor
unit, refer to the Installation Manual attached to the
indoor unit.
Fix with vinyl tape. Set the notch upward.
Attached thermal insulating pipe
Elbow piping kit side
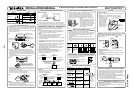
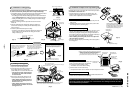
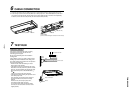
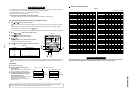
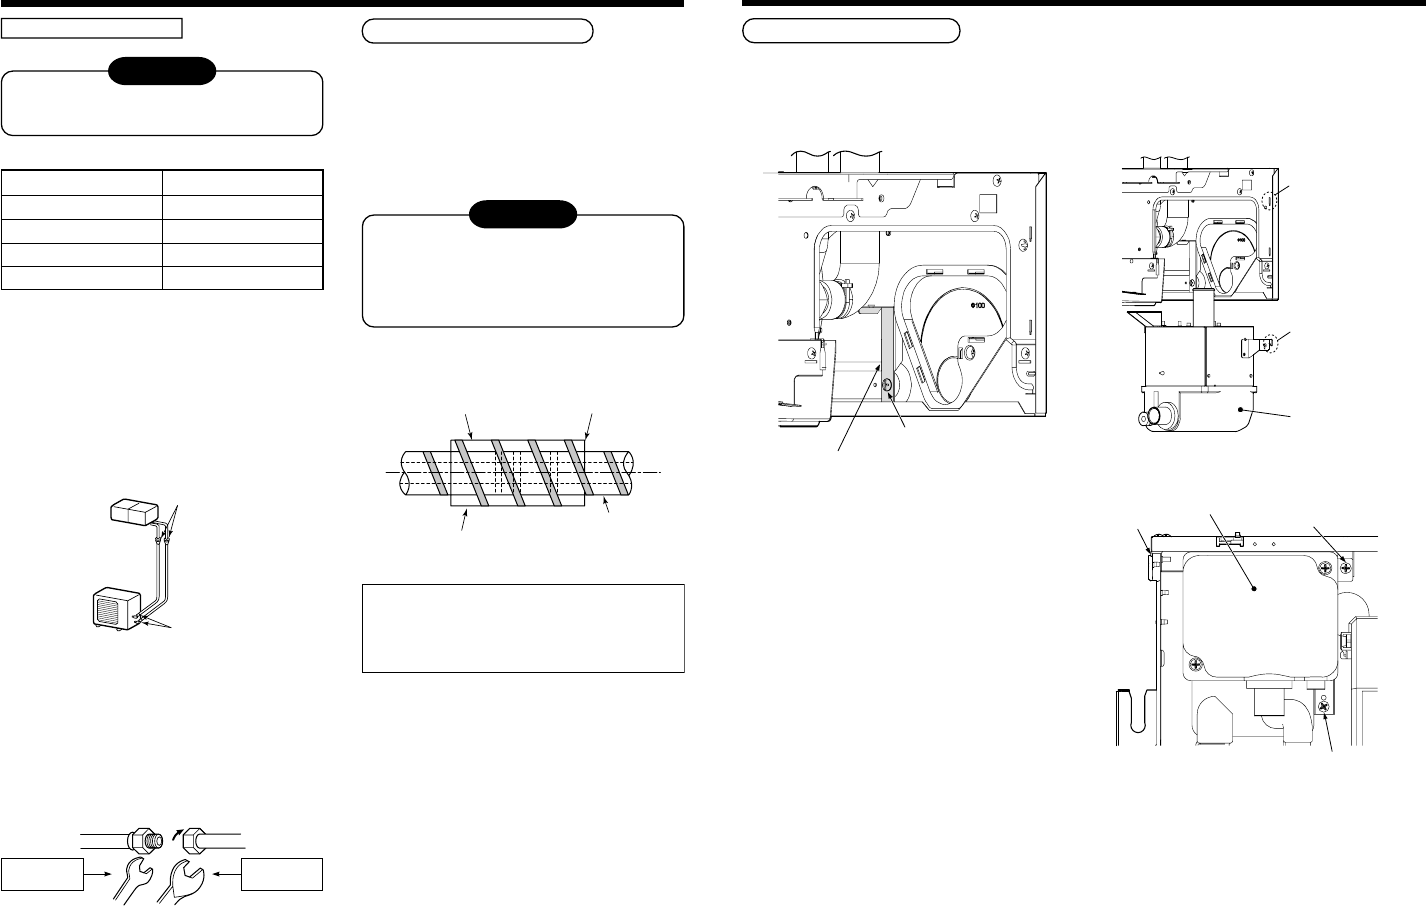
How to install drain up kit
1. Mount the drain up kit fixture to the rear side inside
of the indoor unit. (1 screw)
2. Hang the temporary hanging hook of the drain up
kit to the side slit of the indoor unit from inner side.
Screw the drain up kit to the indoor unit.
(3 screws: Ceiling surface, side face, and drain up
kit fixture)
Screwing of drain up kit fixture
Drain up kit fixture
Side slit of indoor unit
Temporary hanging
hook of drain up kit
Drain up kit
Drain up kit
Hang temporary
hanging hook from
inside of indoor unit.
Screwing
(To side face)
Screwing
(To Drain up kit fixture)
Screwing (To Ceiling surface)
3
INSTALLATION PROCEDURE OF DRAIN-UP KIT
TCB-DP22CE