


Operating the Thermostat
39
V
iewStat Color Communicating Thermostat User Guide
Activating the On-board Humidity Sensor
The thermostat comes installed with an internal on-board humidity sensor. You can use this sensor to
report room humidity. You can also turn off the internal on-board humidity sensor if you do not want to
use it. Perform the following steps to activate the on-board humidity sensor:
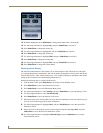
1. From the Main screen, press Mode/Select to access the Current Weather screen.
2. Press Mode/Select to access the 5-Day Forecast screen.
3. Press Mode/Select to access the Thermostat Mode screen.
4. Use the navigation buttons to select Settings, and press Mode/Select to access the Settings screen.
5. Use the navigation buttons to select Advanced Setup.
6. Press Mode/Select to access the Security Code screen.
7. Enter the security code, and select Enter to access the User Preferences screen. See the Entering the
Security Code section on page 28 for more information.
8. Use the navigation buttons to highlight More, and press Mode/Select to access the second User
Preferences screen.
9. On the second User Preferences screen, use the navigation buttons to highlight More, and press
Mode/Select to access the third User Preferences screen.
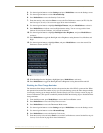
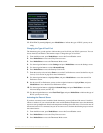
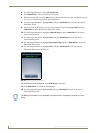
10. Use the navigation buttons to highlight Advanced Setup, and press Mode/Select to access the
Advanced Setup screen (see FIG. 31).
11. Use the navigation buttons to select Humidity Sensor, and press Mode/Select to activate it.
12. Press Mode/Select to toggle whether you want the humidity sensor turned on or off.
Setting the Date and Time on the Thermostat
The thermostat enables you to set the date and time, which displays on the main screen. Perform the
following steps to set the date and time on the thermostat:
1. From the Main screen, press Mode/Select to access the Current Weather screen.
2. Press Mode/Select to access the 5-Day Forecast screen.
3. Press Mode/Select to access the Thermostat Mode screen.
4. Use the navigation buttons to select Settings, and press Mode/Select to access the Settings screen.
5. Use the navigation buttons to select Advanced Setup.
6. Press Mode/Select to access the Security Code screen.
7. Enter the security code, and select Enter to access the User Preferences screen. See the Entering the
Security Code section on page 28 for more information.
8. Use the navigation buttons to highlight More, and press Mode/Select to access the second User
Preferences screen.
9. On the second User Preferences screen, use the navigation buttons to highlight More, and press
Mode/Select to access the third User Preferences screen.
10. Use the navigation buttons to highlight Advanced Setup, and press Mode/Select to access the
Advanced Setup screen.
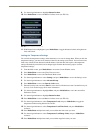
11. Use the navigation buttons to highlight More, and press Mode/Select to access the second
Advanced Setup screen (see FIG. 32).