


C3663M-B (11/09) 45
NOTE: To view video that occurs during the fall-back hour when reverting to standard time from daylight saving time, you must select GMT.
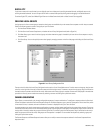
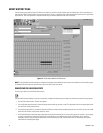
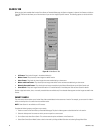
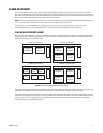
The following video-type colors can be displayed on the time line:
• Event: An alarm event occurred during the 15-minute segment.
• Motion: Only motion events and time-lapse video were recorded during the 15-minute segment.
• Time-Lapse: Only a certain frequency of time-lapse frames were recorded per second during the 15-minute segment.
The storage location of an event's segment is indicated by a shorter colored box below the video-type indicator box. The recorded video can be
stored on a VAU, on a VAU requiring copy to permanent storage, or stored on the network.
NOTES:
• Systems running server software version 2.x or 3.x can also display one or more Continuous recorded video types. These video types
indicate that all images were recorded and stored during the 15-minute segment.
• At any time, you can click the Previous Week or Next Week buttons to view the preceding, or following seven days, on the time line.
• You can control the colors displayed on the Recorded Video page by right-clicking on the color boxes at the bottom of the screen and
selecting a color for each video type and storage location. Colors configured here are also configured for the Event History page
(if applicable) and the recording mode indicators that surround live video panes.
PLAYING BACK RECORDED VIDEO
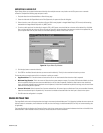
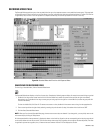
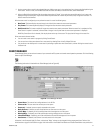
Perform a search as described in the previous section, and then complete the following steps to play back recorded video:
1. Click the portion of the colored box aligned with the time and day when the video you want to view occurred. (You can select any number of
consecutive boxes displayed on the time line by clicking and dragging in any direction.) The Selected Video area then displays the following
information:
• The date and time of the start and end of the period in which all the video you selected was recorded.
• The number of images recorded during all alarm events during the period.
• The number of motion images recorded during motion events during the period.
• The total number of images recorded during time-lapse recording, alarm events, and motion events during the period.
• The total size of all video files recorded during the period.
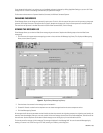
Alternatively, you can enter the time period parameters in the Play Selected Video From area and click Select Video. This can also be used
to narrow the selection you made by clicking on the time line.
2. To select a different portion of video from the time line, click the Clear Selected Video button or simply click the time line.
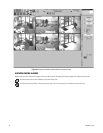
3. Click Play Selected Video. Recorded video and audio is then played back simultaneously from all cameras you searched.
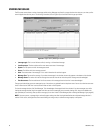
4. Use the counter and the playback controls (Play, Pause Video, Play Fast Reverse, Step Back, Step Forward, and Play Fast Forward) at the top
of the screen to view the desired portions of video. To see the function of each button, hover the mouse pointer over the button without
clicking.
When you are finished viewing the video, you can click the Recorded Video button to return to your search results, or you can perform other tasks.
NOTE: Watch the counter at the top of the playback screen. Video from a specific camera appears only if it was recording at the time indicated.
If only two cameras were continuously recording video at 4:15, only two video panes would display video. If another camera began recording a
motion event at 4:17, three video panes would show video.