


C3663M-B (11/09) 39
COPYING LOCAL CONFIGURATION INFORMATION TO OTHER COMPUTERS
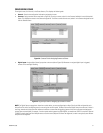
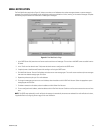
The .INI File Configuration tab allows you to locate the .INI file that contains information about the local configuration so you can copy it to
another client computer. Simply locate the file and copy it to the same location on the other computer over a network, or use a portable data
storage medium.
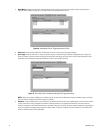
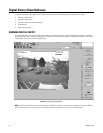
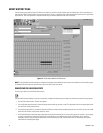
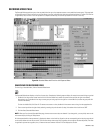
VIDEO CONTROLS TAB
When you select a video pane configuration button, the Video Controls tab appears on the right side of the screen. This tab allows you to change
characteristics of the selected video pane. The following information can be found on the Video Controls tab:
• Brightness and contrast settings for the currently selected camera: The Defaults button returns these to preset values.
• Display options: You can choose to display the current time, date, and camera name on each video pane in various colors. Also, the
Inverse option displays a negative image for the currently selected video pane.
• Client Local Time, Server Time, and GMT (Greenwich Mean Time, equal to Universal Time): This applies to time displayed on
OSD and the playback counter.
• Audio On: Not used with DS NVR and DS NVs.
• De-interlace Mode: This allows you to eliminate pixelated images in high resolution video that contains a large amount of motion. This
feature applies only to live or recorded video with a 704 × 480 (4CIF) resolution.
• The Delay Live slider bar: When set to the left video displays at its fastest rate. Moving this to the right decreases the displayed image
rate.
NOTE: The “Apply to All” option allows you to apply Video Quality and Delay Live settings to all displayed cameras.
• An offset video pane configuration button (2 × 2, 3 × 3, and 4 × 4 views only):
This button increases the size of the currently selected video pane and decreases the size of the rest of the displayed video panes. This
allows you to see video in a larger video pane (as with 1 × 1 mode), but still displays the other video panes. To view another camera’s video
in the larger video pane, click the small pane; this switches the size and location of the large and small panes. To return to the pane format,
click the video pane configuration button that appears in the same place on the Video Controls tab, or click one of the buttons on the
toolbar.
• When you play back video, the Video Controls tab also includes a Play Video section that allows you to control the playback speed.
Available options are As Fast as Possible, In Real Time, and Skipping x.x Seconds. To configure the number of seconds skipped with the
final option, select the up or down arrows to change the number in half second increments. The “As Fast as Possible” option does not skip
any frames.
NOTE: The video settings adjusted on the Video Controls panel are different from the video settings adjusted in DSAdmin. These video settings
merely change the video as it appears in the live and recorded video panes, whereas the video settings in DSAdmin affect the video as it is
digitized and captured.
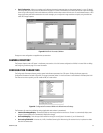
MANUAL RECORDING
The Video Controls tab also includes the following button for users with Manual Record permission:
This button allows you to start time-lapse recording of video in the currently selected video pane, overriding the recording schedule set in
DSAdmin. When you select the Manual Record button, a menu allows you to select a recording speed. Digital Sentry records video in the
selected video pane at the selected speed, until you click the STOP button that appears in the Manual Record button’s place.