


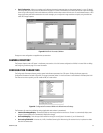
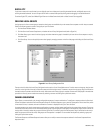

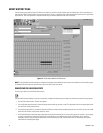
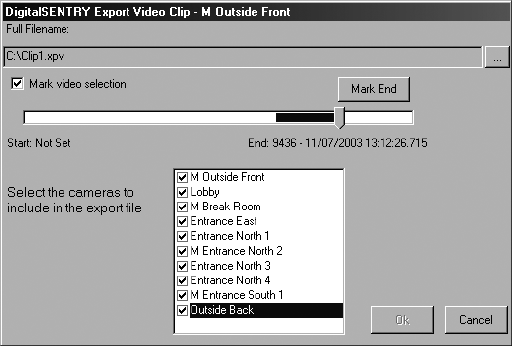
Figure 36. Export Video Clip Window
C3663M-B (11/09) 41
EXPORTING A VIDEO CLIP
Digital Sentry allows you to export simultaneous video clips from multiple cameras to any location on the DS system or over a network
connection. Complete the following steps to export a movie:
1. Play back video from the Recorded Video or Event History page.
2. Pause the video and click Export Movie on the Print/Export tab; this opens the Save As dialog box.
3. Select a location, enter a file name, and s
elect a file type: XPA format (playable in Integral Media Player); EXE format (a self-extracting
executable with Integral Media Player built in); MPEG; or AVI.
4. To mark a smaller portion of the video clip for export in EXE or XPV format, move the slider bar to the start of the desired cl
ip, click Mark
Start, and drag the slider bar to the end of the clip (refer to Figure 36). You can also select the cameras to include in the exported file, but
you can export video from only one camera at a time when exporting in MPEG or AVI format. Click OK.
5. Click the play button to start the video clip.
6. Click STOP on the Video Controls tab when you want to end the video clip. The clip is then saved to the location you chose.
To view the movie you saved, open the file in the location in which you saved it.
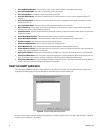
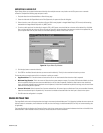
• Copy Destination: Th
is is the drive letter and name of the disc or non-local network drive where the video is exported.
• Maximum Copy Duration: This is the amount of video that the system attempts to export. If you select Fill Destination Media, the disc or
drive is completely filled by the most recent recorded video (or until all video is exported). Otherwise, video from the most recent days,
hours, and minutes selected from the drop-down menu is exported; if video from the selected time period is too large, only the most recent
video from that time period is exported.
• Cameras T
o Include: Video is exported for all cameras selected here. All camera inputs are listed even if they are not enabled. However,
video from the selected inputs is exported only if the camera is enabled and recorded video from that input is stored on the system.
7. Click OK when the configuration is
complete.
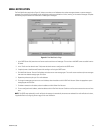
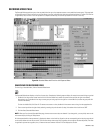
IMAGE DETAILS TAB
The Image Details tab contains information about the image in the currently selected video pane. This information includes the camera name, the
VAU the camera is connected to, the IP address of the VAU, the size of the image, the video standard (NTSC or PAL), and current recording rate
(if applicable).
The Image Details tab also displays the Connection Status, which is the current status of the connection between the client and th
e VAU of the
selected camera. Green indicates an active connection, and red indicates an inactive connection.