


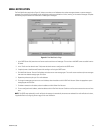


C3663M-B (11/09) 43
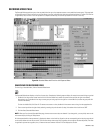
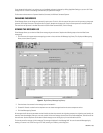
5. In the “For (Days)” box, select the length of your search period (the default and maximum are both seven). Also select either Client Local
Time, Server Time, or GMT.
6. In the “From” field, select the first day of the period you want to search. In the “To” field, the last day of the period is automatically
displayed, based on the duration you selected in the “For (Days)” box.
7. Click the Get Event Information button.
NOTES:
• To view events that occur during the fall-back hour when reverting to standard time from daylight saving time, you must select GMT.
• When you first view the Event History, the most recent seven days are selected (from midnight of the first day to 11:59:59 p.m. of the
current day, even if a portion of the current day has not yet occurred). If you change this, you can quickly return to the most recent days by
clicking the Today button.
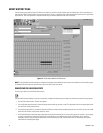
Search results are then listed in two ways:
• Each event that occurred during the time period you selected is listed on the right side of the screen. The information displayed for each
event includes the date and time it occurred and the zone where it occurred. The total number of events is indicated below the date
selection fields. If the number of events exceeds 2000, events are displayed only in groups. You can select a group from a drop-down list
beside the Get Event Information button.
• All events that occurred during the time period you selected are also displayed on the time line as boxes, using the color indicated at the
bottom of the screen. They are aligned on the row corresponding to the day they occurred and on the column below the hour they occurred.
(The time line always shows seven days, regardless of the length of the selected period.) Events are organized in quarter-hour segments;
thus, all events that occur between 4:00 and 4:15 are displayed as one box.
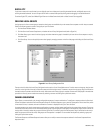
NOTE: You can control the colors displayed on the Event History page by right-clicking the colored boxes at the bottom of the screen, and then
selecting a color for each video type and storage location. Colors configured here are also configured for the Recorded Video page and the
recording mode indicators that surround live video panes.
TIP: At any time, you can click the Previous Week or Next Week buttons to view the preceding or following seven days on the time line.
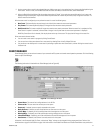
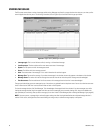
PLAYING BACK A LOGGED EVENT
Perform a log search as described in the previous section, and then complete the following steps to play back a logged event:
1. Click the portion of the colored box aligned with the time and day when the event you want to view occurred. The events corresponding to
your selected segments are highlighted in the list on the right side of the screen.
2. If you want to play back synchronized audio along with the video, select one or more audio channels from the list near the top-right corner
of the screen.
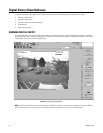
3. Double-click the highlighted event from the list that corresponds to the video you want to view. Recorded video and audio are
simultaneously played back from all cameras in the zone where the event occurred.
4. Use the counter and the playback controls (Play, Pause Video, Play Fast Reverse, Step Back, Step Forward, and Play Fast Forward) at the top
of the screen to view the desired portions of video. To see the function of each button, hover the mouse pointer over the button without
clicking.
5. When you play back an alarm event, the Video Controls tab appears. To return to the list of events, click the down-arrow button on the left.
When you are finished viewing the event, you can click the Event History button to return to your search results, or you can perform other tasks.
NOTE: When you play an event from the Event History, the Video Controls panel includes a Play By Frame/Time feature. Play By Frame plays only
recorded frames, skipping over periods without recorded video. Play By Time plays back video based on time elapsed, including periods when no
video was recorded.