


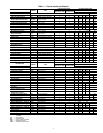


11
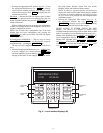
2. Press 3 and then . The LID display will show:
Controller Password
3. Press . The LID display will show:
LogintoController
Enter Password
NOTE: The LID display has two modes: Edit mode and
Status/Maintenance mode. If the LID display is in Edit
mode, then the display will only show the word “pass-
word.” Press the key to toggle to the Status
mode.
Press the to display:
LogintoController
Enter Password
4. Key in the password and press .
NOTE: The default password is 1111.
5. The LID display will show:
LogintoController
Logged In
NOTE: At this point, for the 50BV unit only, the run
test will follow these steps:
a. Press 37 . The display will show:
Custom Program
b. Press . The display will show:
2.0 Global Dictionary
OMNIZONE
c. Press (NOTE: Display will flash,
indicating that the device is now in edit mode.)
The display will show:
2.0 Global Dictionary
OMNIZONE
d. Press . The display will show:
Compressor Stages
4.00
NOTE: A 50BV unit with only 2 compressors will
display 2.00. Skip to Step 6.
e. Input 2.00 and Press . The display will show:
Compressor Stages
2.00
6. Press . The LID display will show:
Hardware Points
7. Press again. The LID display will show:
Software Points
8. Press . The LID display will show:
Compressor 1 Status
9. Press 6 times. The LID display will show:
Factory/Field Test
Stop
10. Press 1 then , The LID display will show:
Factory/Field Test
Start
NOTE: At this point, the yellow warning light on the
display panel will be lit and will stay on throughout the
run test. After each successful step, the red alarm light
will blink once.
11. The control module will now check if there is input from
BYPAS(50XJ),DHS,FSD,SAT,DSP,andCSMUX.
If the control does not receive open/open/closed/
in range/in range/in range, the red alarm LED will go
on and the test will stop.
If the inputs are OK, the red alarm LED blinks once
and the test continues.
12. Next, the control forces the Supply Fan (SF) and all of the
Compressors (COMP) off, and waits 15 seconds.
For the 50XJ unit, if the REMOTE LED and AUTO
LED on the VFD display are on, the red LED blinks
once and the test continues.
NOTE: For the 50XJ unit, if the controller is config-
ured with a water Economizer, the delay is 2 min. and
both valves are commanded to 0%. Both water valves
will close.
13. The control forces SF on and SPEED to 20 percent and
then waits 30 seconds.
If the VFD display shows “10.6 Hz,” the Remote and
Auto LEDs blink, and the fan goes on, then the red LED
on the control module blinks once and the test continues.
NOTE: For the 50XJ unit, if the controller is config-
ured with a water Economizer the delay is 2 min. and
Econo valve is commanded to 100%. The economizer
valve will open and the RVS/HD (reverse/head
pressure) valve will remain closed.
14. The control forces SF on and SPEED to 35 percent and
then waits 30 seconds.
If the VFD display shows “20.0 Hz,” the Remote and
Auto LEDs blink, and the fan goes on, then the red LED
on the control module blinks once and the test continues.
NOTE: For the 50XJ unit, if the controller is configured
with a water Economizer the delay is 2 min. and RVS/
HD valve is commanded to 100%. The economizer valve
is commanded to 0% and the RVS/HD valve will open.
15. The control forces SF off then waits 15 seconds.
If the VFD display shows “Off,” the Remote and Auto
LEDs are off, and the fan goes off, then the red LED on
the control module blinks once and the test continues.
NOTE: For the 50XJ unit, if the controller is configured
with a water Economizer both valves are commanded
to 0%. The economizer valve and RVS/HD will close.
NOTE: For the 50BV unit, the steps below (16-24)
will be completed for the number of compressors
configured.
16. The control forces CMP1 (compressor 1) on then waits
5 seconds.
If CSMUX is not in range the red LED will go on and
the test will stop.
If CSMUX is in range, the red LED blinks once and
the test continues.
17. The control forces CMP1 off.
18. The control forces CMP2 (compressor 2) on then waits
5 seconds.
If CSMUX is not in range the red LED will go on and
the test will stop.
If CSMUX is in range, the red LED blinks once and
the test continues.
19. The control forces CMP2 off.
20. The control forces CMP3 (compressor 3) on, if config-
ured, then waits 5 seconds.
If CSMUX is not in range the red LED will go on and
the test will stop.
If CSMUX is in range, the red LED blinks once and
the test continues.
21. The control forces CMP3 off.
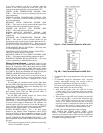
SET
ENTER
EXPN/EDIT
EXPN/EDIT
ENTER
ALGO
ENTER
EXPN/EDIT
ENTER
ENTER
STAT
STAT
ENTER
ENTER