


Chapter 1 Working with HDV 15
Working with HDV in Final Cut Pro
If you’ve previously worked with DV, you’ll find that the HDV workflow is similar.
However, the nature of MPEG-2 long-GOP editing can add significant rendering time
when editing native HDV. To avoid this, you may want to choose one of the other
HDV editing workflows.
There are three workflows for working with HDV footage in Final Cut Pro:
 Native MPEG-2 HDV capturing, editing, and rendering: For more information, see
“Native HDV Editing Workflow” on page 15.
 Transcoding, editing, and rendering using an alternative codec: For more information,
see “Transcoded HDV Editing Workflow” on page 30.
 Native MPEG-2 HDV capturing and editing, but rendering using the Apple ProRes 422
codec: For more information, see “Rendering HDV” on page 27.
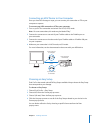
Native HDV Editing Workflow
If you use this method, you capture, edit, and output your original MPEG-2 HDV data
throughout the entire process. This process is referred to as native editing because
Final Cut Pro works directly with the MPEG-2 data captured from your HDV tapes.
Native HDV playback is processor-intensive because displaying a single frame can
require decoding of several frames earlier or later in the video stream. As a result, you
may be able to play back fewer real-time effects when editing in this format. However,
there are many benefits to native HDV editing:
 Native HDV editing uses less disk space because long-GOP MPEG-2 HDV video has a
very low data rate.
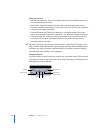
 Outputting HDV to tape requires little processing before output because your video is
already in the native HDV format. Only segments of your sequence that contain cuts or
effects must be reencoded, or conformed, to create the proper HDV GOP pattern.
This workflow is useful for cuts-only edits that you want to quickly output back to tape,
or for export to other MPEG formats.