


46 C1307M-C (8/07)
SHARPNESS
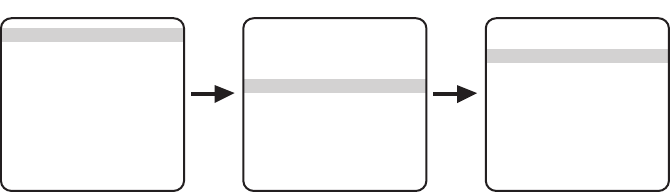
Use the Sharpness setting to set the digital sharpness of the camera. Settings include Lowest, Low, Medium, High, and Highest. The default is
Medium.
Increasing the Sharpness setting can enhance image detail in some scenes; higher Sharpness settings also increase image noise. Decreasing the
Sharpness setting can soften image detail in some scenes, that is, lose some image detail; however, lower Sharpness settings also decrease
image noise. Select the setting that is best for the scene.
NOTE: You can change the Sharpness setting when AGC Mode is set to either Automatic or Manual.
To set the sharpness of the camera:
1. Program preset 95 (28). The main menu appears.
2. Position the cursor (>) beside <Camera>. Press the Iris Open button; the menu appears.
3. Position the cursor (>) beside <Sharp/Contrast/Bias>. Press the Iris Open button; the menu appears.
4. Position the cursor (>) beside Sharpness. Press the Iris Open button; the cursor moves to the right.
5. Move the joystick up or down until the desired Sharpness setting appears. As you move through settings, the sharpness changes on the
monitor.
6. Do one of the following:
• Select: Press the Iris Open button to select the option.
• Cancel: Press the Iris Close button to leave the setting as is.
NOTE: You can also adjust the Sharpness setting by using the Focus Near and Focus Far buttons on your controller (refer to How to Operate Your
System on page 14).
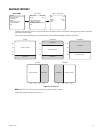
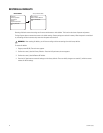
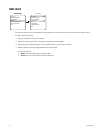
*These options only appear when AGC Mode is set to Manual.
AGC Mode Automatic
Sharpness Medium
Contrast 64*
Hot Bias 100*
Save Profile Custom 1
Exit
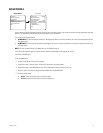
Sharp/Contrast/Bias Menu
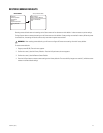
Display Type White Hot
Profile Night
<Sharp/Contrast/Bias>
<Region of Interest>
<Flat Field Correction>
Exit
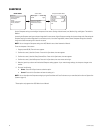
Camera Menu
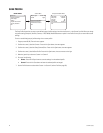
<Camera>
<Power Up Mode>
<Limit Stops>
<Other>
<System Information>
<Factory Defaults>
Exit
MAIN MENU