


3. INSTALLATION
RH-981A
17
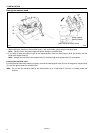
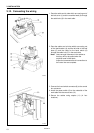
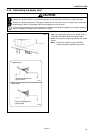
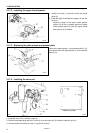
3-13. Installing the air tubes
Connect the air tube from the compressor to the air unit underneath the work table.
1. Turn the nut (1) at the end of the air tube, and then
connect the tube to the valve (2).
2. Open the air cock (3) on the compressor.
Check that there is no air leaking from the valve
connection.
3. Open the cock (3) by turning it in the direction of the
arrow.
The meter needle will move clockwise.
4. Adjust the air pressure.
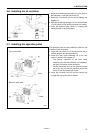
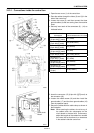
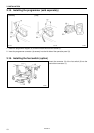
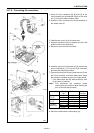
3-13-1. Adjusting the air pressure
Set the air pressure for the knife pressure adjustment regulator (3) to the lowest pressure at which the knife can still
cut the material. Set the standard air pressure for the main regulator (1) to 0.5 MPa.
To increase the air pressure
1. Gently lift the knob (2) of the main regulator (1) and
turn it in the direction of the arrow in the illustration.
The pressure will increase when the knob (2) is
turned clockwise.
2. Gently lift the knob (4) of the knife pressure
adjustment regulator (3) and turn it in the direction
of the arrow in the illustration.
The pressure will increase when the knob (4) is
turned clockwise.
* The pressure for the knife pressure adjustment
regulator (3) is adjusted to 0.3 MPa. Be careful not
to increase this pressure needlessly, otherwise
poor cutting performance or damage to the knife
may result.
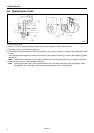
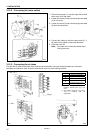
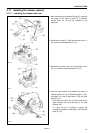
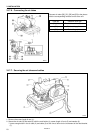
To decrease the air pressure
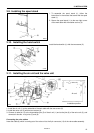
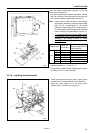
1. Close the cock (5). (The needle will remain at the
high pressure position.)
2. Turn the knob screw (6) in the direction of the arrow
in the illustration to loosen it. Make sure that you
turn it in the correct direction.
The air will escape from the reservoir and the needle
will drop.
3. Tighten the knob screw (6).
4. To reduce the air pressure, gently lift knob (2) or
knob (4) and turn it counterclockwise.
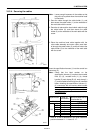
5. Open the cock (5). Air will enter the reservoir and
the needle will move
3006Q
(0.3MPa)
(0.5MPa)
3007Q
(0.5Mpa)
(0.3Mpa)
To close
To tighten
To loosen
3005Q
Closed
Open