


3. INSTALLATION
RH-981A
16
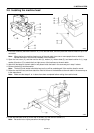
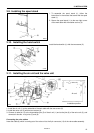
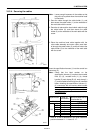
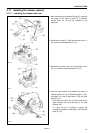
3-12-4. Securing the cables
Note: Leave enough looseness in the cables so that
they will not be pulled when the machine head
is tilted back.
1. Pass the cable through the cable holder (1), and
then secure the cable holder (1) to the underside of
the work table with the screw.
2. Pass the air tube and the hand switch cable through
the cable holder (2), and then secure the cable
holder (2) to the underside of the work table with the
screw.
3. Place the machine head cable together with the
valve cable assembly and motor cable, pass them
all through the cable holder (3), and then secure the
cable holder (3) to the underside of the work table
with the screw.
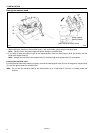
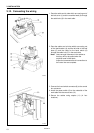
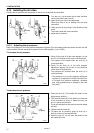
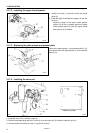
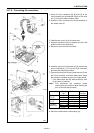
Insert the specification harness (1) into the control box
connector (2).
Note: Check that the label number on the
specification harness (1) matches the movable
knife (R) (3), movable knife (L) (4), thread
handler (5), work clamp (R) (6), work clamp (L)
(7) and movable knife driving cam (8) numbers
before inserting the specification harness (1).
(If a connector with an incorrect label number
is connected, it may cause problems such as
damage to the sewing machine or thread
trimming errors.)
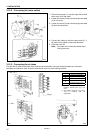
Specification
Label No.
of harness
Right/left work clamp No.
Right/left movable knife No.
Thread handler No.
-00, -01 0
L1 1 1
L2 2 2
L3 3 3
L4 4 4
L5 5 5
L6 6 6
-02
L7 7 7
* There is 10 mm of difference in the knife installation
positions between L1 - L4 and L5 - L7.
3132Q
3002Q
3004Q
3003Q