


–141–
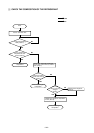
8 PREPARATION, REPAIRS AND REFRIGERANT REFILLING WHEN REPAIRING
LEAKS
[1] Location of leaks: Extension piping or indoor units (when cooling)
(Pump down operation)
1 Attach a pressure gage to the low-pressure servicing check joint (CJ2).
2 Stop all of the indoor units. When the compressor has stopped, shut off the liquid ball valve (BV2) for the outdoor
unit.
3 Stop all of the indoor units. When the compressor has stopped, turn the SW3-6 switch on the main board for the
outdoor unit to ON. (This will start the pump down operation causing all of the indoor units to enter the cooling
mode.)
4 While in the pump down operation (SW3-6 ON), the low pressure (LPS) will reach below at least 2 kg/cm
2
G
(0.20 MPa) or the indoor unit and the compressor will automatically shut down within 15 minutes of starting the
pump down operation. Shut down all of the indoor units and the compressor if the pressure gage for the low-
pressure servicing joint (CJ2) reads 1.5 kg/cm
2
G (0.15 MPa) or after running the pump down operation for 20
minutes.
5 Shut off the gas ball valve (BV1) for the outdoor unit.
6 Remove any refrigerant remaining in the extension piping and the indoor units.
Be sure to recover the refrigerant without releasing it into the air.
7 Repair the location of the leak.
8 After repairing the leak, create a vacuum to remove any air from inside of the extension piping or the indoor
units.
9 Open the ball valves for the outdoor unit (BV1 and BV2), turn the SW3-6 switch to OFF, adjust refrigerant levels
and confirm proper circulation.