


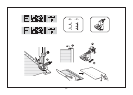
Changer le pied.
Régler la machine comme indiqué " ".
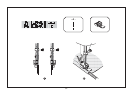
Un fil de soutien est nécessaire pour les
boutonnières sur tissus élastiques
Couture d'une boutonnière sur un tissu
élastique (E)
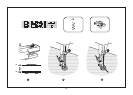
1. Marquer la position de la boutonnière sur le
tissu.
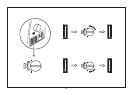
2. Positionner le pied sur la marque, abaisser le
pied (A)
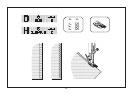
3. Ouvrir la plaque de boutonnière et introduire
le bouton (B)
4. Abaisser le levier de boutonnière et tirer vers
l'arrière (C)
5. Tenir légèrement le fil supérieur et démarrer
la machine
6. Coudre la boutonnière (D)
7. Arrêter la machine à la fin de la boutonnière
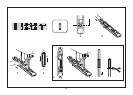
1. Préparation comme mentionné plus haut
2. Poser le fil de soutien à l'arrière du pied et
tirer vers l'avant les deux extrémités du fil, les
fixer dans la rainure et nouer les bouts
3. Abaisser le pied et coudre la boutonnière
*Adapter la largeur du point à l'épaisseur du
tissu
4. Quand la boutonnière est terminée, tirer
légèrement le fil, fixer et découper les surplus
Hace-ojal es un proceso simple que se
suministra resultados dignos
Hacer ojal
Hacer presatela sobre telas elástocas (fig. E)
Cuando cosiendo la prensatela sobre tela
elástica, colocar el cojo hilo bajo el punto
prensatela.
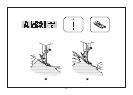
1. Usando tiza de sastre, marcar la posición del
ojal sobre la tela.
2. Montar el pie ojal y puesta el disco selector
de modelos a " ".
3. Bajar el pie prensatela alineando las marcas
sobre el pie con las marcas sobre la tela
como se demuestra en la fig. (A). (La
dirección bar frontal debe ser cosido primero).
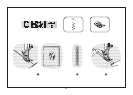
4. Abrir el plato del botón e insertar el botón. (fig.
B)
5. Bajar la palanca prensatela y empujar poco la
espalda como se demuestra en fig. (C).
6. Cuando mantiene lentamente el hilo superior,
iniciar la máquina.
7. Punto prensatela es listo en orden
demostrando en fig. (D).
8. Para la máquina cuando la prensatela está
cosida.
1. Marca la posición de presatela sobre la tela
con tiza de sastre, montar el pie prensatela,y
puesta el disco selector de modelos a " ".
2. Coloca el cojo hilo sobre final de espalda del
pie prensatela, y llevar dos finales de cojo hilo
a frente del pie, insertarlos sobre las ranuras
y atarlos tempraria.
3. Baja el pie prensatela e inciar cosiendo.
*Pone la anchura del punto para montar el
diametro del cojo hilo.
4. Una vez el coser está completa, lentamente
empujar el cojo hilo para remover cualquier
flojo, entonces cortar los excesos.
Buttonhole-making is a simple process that
provides reliable results.
Making a Buttonhole
Making a Buttonhole on Stretch Fabrics (fig. E)
When sewing buttonholes on stretch fabric,
place a gimp thread under the buttonhole
stitching.
1. Using tailor's chalk, mark the position of the
buttonhole on the fabric.
2. Attach the buttonhole foot and set the pattern
selection dial to " ".
3. Lower the presser foot aligning the marks on
foot with the marks on the fabric as shown in
fig. (A). (The front bar tack will be sewn first.)
4. Open the button plate and insert the button.
(fig. B)
5. Lower the buttonhole lever and push it back
slightly as in fig. (C).
6. While gently holding the upper thread, start
the machine.
7. Buttonhole stitching is done in the order
shown in fig. (D).
8. Stop the machine when the buttonhole is sewn.
1. Mark the position of the buttonhole on the
fabric with the tailor's chalk, attach the
buttonhole foot, and set the pattern selection
dial to " ".
2. Hook the gimp thread onto the back end of
the buttonhole foot, then bring the two gimp
thread ends to the front of the foot, insert
them into the grooves and temporarily tie
them there.
3. Lower the presser foot and start sewing.
*Set the stitch width to match the diameter of
the gimp thread.
4. Once sewing is completed, gently pull the
gimp thread to remove any slack, then trim off
the excess.
How to sew buttonholes (one-step
buttonholes)
Coser ojales (un-paso ojales)
Coudre les boutonnières/ boutonnières
à une position
GB
E
F
59