


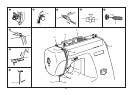
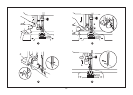
Ouvrir la plaque glissière de la canette en la
déplaçant vers la droite.
Attention:
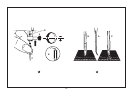
Placer l'interrupteur d'alimentation sur arrêt
"O" avant d'insérer ou enlever la canette.
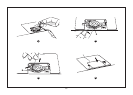
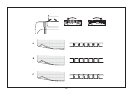
1. Insérer la canette dans son logement, le fil
étant orienté dans le sens anti-horaire
(flèche).
2. Tirer le fil en le faisant passer dans la fente
(A).
3. Tirer le fil dans le sens horaire jusqu'à ce
qu'il se place dans l'encoche (B).
4. Tirer une longueur de fil approximative de
15 cm (6 pouces) puis remettre en place la
plaque glissière de la canette.
Gira el interruptor a la posición "O" antes
de insetar y/o remover la bobina.
Cuando insertando o removiendo la canilla,
la aguja debe ser completamente subida.
Atención:
1. Inserta la canilla a la porta-canilla con el
corredor de hilo a dirección dextrorso
(flecha).
2. Pone el hilo pasando el sedimento (A).
3. Tira el hilo dextrorso hasta que el traspié
entrar la muesca (B).
4. Saca más o menos 15cm del hilo y sujetado
con la tapa plato de canilla.
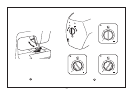
Turn power switch to "O" before inserting or
removing the bobbin.
When inserting or removing the bobbin, the
needle must be fully raised.
Attention:
1. Inserting the bobbin in the bobbin holder
with the thread running counter clockwise
direction (arrow).
2. Pull the thread through the slit (A).
3. Draw the thread clockwise until it slips into
the notch (B).
4. Pull out about 15 cm of thread and attached
the bobbin cover plate.
Inserting the bobbin
Colocación de la canilla
Insertion de la canette
GB
E
F
21