13
Compressor
Lubrication
The compressor i s charged with the correct amount of oil
at the factory.
UNIT DAMAGE HAZARD
Failure to follow this caution may result in damage to
compone nts.
The compressor is in a PuronR refrigerant system and
uses a polyole ster (POE) oil. This oil is extremely
hygroscopic, meaning it absorbs water readily. POE
oils can absorb 15 times as much water as other oils
designed for HCFC and CFC refrigerants. Avoid
exposure of the oil to the atmosphere.
CAUTION
!
Replacing Compressor
The c ompressor used with Puron refrigerant contains a
POE oil. This oil has a high affinity for moisture. Do not
remove the compressor’s tube plugs until ready to insert
the unit suction and discharge tube ends.
Compressor mounting bolt torque is 65--75 ft--lbs.
Compressor
Rotation
On 3 --phase units with scroll compressors, it is important
to be certain com pressor is rotating in the proper
direction. To determine whether or not compressor is
rotating in the proper direction:
1. Connect service gauges to suction and discha rge pres-
sure fittings.
2. Energize the compressor.
3. The suction pressure should drop and the discharge
pressure should rise, as is normal on any start--up.
NOTE: If the suction pressure does not drop and the
discharge pressure does not rise to normal levels:
4. Note that the evaporator fan is probably also rotating
in the wrong direction.
5. Turn off power to the unit.
6. Reverse any two of the unit power leads.
7. Reapply power to the compressor.
The suction and discharge pressure levels should now
move to their normal start --up levels.
NOTE: When the compressor is rotating in t he wrong
direction, the unit makes an elevated level of noise and
does not provide cooling.
Filter Drier
Replace whenever refrigerant system is exposed to
atmosphere. Only use factory specified liquid--line filter
driers with working pressures no less than 650 psig. Do
not install a suction--line filter drier in liquid line. A
liquid-- line filter drier designed for use with Puron
refrigerant is required on every unit.
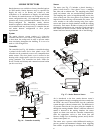
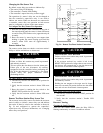
Condenser--Fan Location
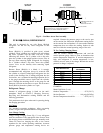
See Fig. 13.
1. Shut off unit power supply. Install lockout tag.
2. Remove condenser--fan assembly (grille, motor, a nd
fan).
3. Loosen fan hub setscrews.
4. Adjust fan height as shown in Fig. 13.
5. Tighten setscrews.
6. Replace condenser--fan assembly.
Conduit
0.14 in + 0.0 / -0.03
C08448
Fig. 13 -- Co ndenser Fan Adjustment
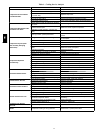
Troubleshooting Cooling System
Refer to Table 1 for additional troubleshooting topics.
580J


