


EMBROIDERING TUTORIAL
—
——————————————————————————————————————————————————————————————
——
76
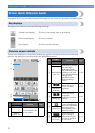
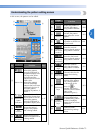
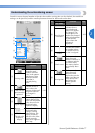
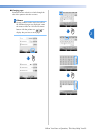
• The functions and operations for the
preview key 7 is the same in both the
pattern editing screen and the
embroidering settings screen.
No.
Display
Function Page
Key Name
1
Makes an appliqué
piece from a desired
pattern. The outline for
the appliqué piece is
sewn around the
pattern.
p. 117
Embroidery
appliqué
key
2
When stabilizer
material is not affixed
to the fabric, sew
basting stitches along
the outline of the
pattern to minimize
shrinkage of the
stitching and
misaligned patterns.
p. 116
Embroidery
basting key
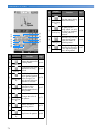
3
Rotates the entire
embroidery pattern
when it consists of
multiple patterns that
have been combined.
p. 97,
p. 181
Rotate key
4
Specifies that automatic
lock stitch is sewn
when the thread is
trimmed.
p.122
Lock
stitching
(end) key
5
Specifies that automatic
lock stitch is sewn at
the beginning of the
pattern and at the
beginning of sewing
after thread trimming.
p.122
Lock
stitching
(beginning)
key
6
Touch to return to the
pattern editing screen.
Edit key
3
6
5
2
9
A
B
7
0
8
4
1
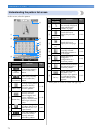
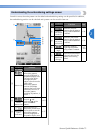
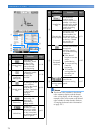
7
Displays an image of
the pattern that is to be
embroidered so it can
be previewed.
p.46
Preview key
8
Moves the sewing
position of the whole
pattern in the direction
of the arrow. (If is
touched, the sewing
position is moved to the
center of the
embroidering area.)
p.96
Positioning
keys
9
Specifies the needle
position at the
beginning of sewing
and at the end.
p.123
Starting/
ending
position key
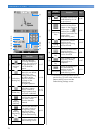
0
Moves the embroidery
frame so that the
embroidering position
can be checked.
p.51
Trial sewing
key
A
Save a pattern in the
machine’s memory,
USB media or a
computer.
p.187
Memory
key
B
Finish all operations in
the embroidering
settings screen and
continues to the
embroidering screen.
p.52
Sewing key
No.
Display
Function Page
Key Name