


43Part number 550-141-850/0699
• Installation • Start-Up • Parts • Maintenance
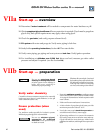
Start-up — preparation (cont.)VIIb
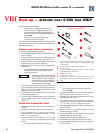
Verify gas/air orifice plate
The proper orifice plate must be
used. Failure to do so will cause
severe personal injury, death or
substantial property damage.
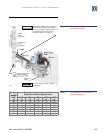
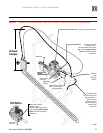
1. Remove the jacket front panel.
2. Read the boiler size written on the gas/air orifice label
tab, verifying the correct size. See Figure 5b for details.
3. The orifice plate must be plain aluminum for natural
gas. For propane gas, the exposed tab of the plate
should be red.
4. Replace the orifice plate if necessary, following the
guidelines of Section IIc in this manual.
Check for gas leaks
Before starting the boiler, and during
initial operation, smell near the floor
and around the boiler for gas
odorant or any unusual odor. Do
not proceed with start-up if there is
any indication of a gas leak. Repair
any leak at once. Failure to comply
could result in severe personal injury,
death or substantial property
damage.
Propane boilers only — Your
propane supplier mixes an odorant
with the propane to make its presence
detectable. In some instances, the
odorant can fade, and the gas may
no longer have an odor. Before start-
up (and periodically thereafter), have
the propane supplier verify the
correct odorant level in the gas.
Failure to comply could result in
severe personal injury, death or
substantial property damage.
Fill the system with water
1. Close manual and automatic air vents and boiler
drain cock.
2. Fill to correct system pressure. Correct
pressure will vary with each application. Typical cold
water fill pressure for a residential system is 12 psi.
3. Purge air from system:
a. Connect a hose to the purge valve (shown in
suggested piping illustrations in this
manual). Route hose to an area where water
can drain and be seen.
b. Close the boiler or system isolation valve
between the purge valve and fill connection to
the system.
c. Close zone isolation valves.
d. Open quick-fill valve on cold water makeup
line.
e. Open purge valve.
f. One zone at a time, open the isolation valves.
Allow water to run through the zone,
pushing out the air. Run until no noticeable
air flow is present. Close the zone isolation
valves and proceed with the next zone.
Follow this procedure until all zones are
purged.
g. Close the quick-fill water valve and purge
valve and remove the hose. Open all isolation
valves. Watch that system pressure rises to
correct cold-fill pressure.
h. After the system has operated for a while,
eliminate any residual air by using the
manual air vents located throughout the
system.
i. Relieve any residual air in the boiler piping
using the manual air vent (page 3, item i)
installed on the boiler supply piping.
j. If purge valve is not installed, open manual
air vents in system one at a time, beginning
with lowest floor. Close vent when water
squirts out. Repeat with remaining vents.
4. Open automatic air vent (diaphragm- or bladder-
type expansion tank systems only) one turn.
Inspect system water piping
After filling the boiler and system with water, inspect
all piping
throughout the system for leaks. If found,
repair immediately. Repeat this inspection after the boiler
has been started and the system has heated up.
Leaks must be repaired at
once
. Failure to do so can damage
the boiler, resulting in substantial
property damage.
Do not use petroleum-based
cleaning or sealing
compounds
in boiler system.
Severe damage to boiler will occur,
resulting in substantial property
damage.