


Ridge Tool Company
11
7. Tighten the feedscrew handle slowly and continu-
ously until the pipe is cut. Do not force the cutter
into the workpiece.
8. Release the foot switch and remove your foot from the
housing.
9. Swing pipe cutter back to the UP position.
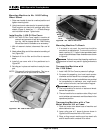
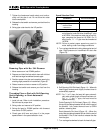
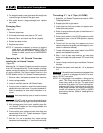
Figure 9 – Reaming with 344 Reamer
Reaming Pipe with No. 344 Reamer
1. Move reamer arm into DOWN position.
2. Depress and hold the foot switch down with left foot
and feed carriage handwheel towards pipe.
3. Position reamer into pipe and complete reaming by
exerting slight pressure on handwheel (Figure 9).
4. Retract reamer and return reamer to UP position.
5. Release foot switch and remove your foot from the
housing.
Threading Pipe or Rod with Self-Opening,
Quick-Opening, or Semi-Automatic
Die Head
1. Install die set. Refer to die installation procedure.
Set die head to proper size.
2. Swing cutter and reamer to UP position.
3. Swing die head to DOWN position with throwout
lever set to CLOSE position.
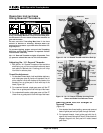
4. Check gear shift lever and place it in the proper
speed shown in the speed selection chart.
NOTE! 20 amp circuits with good line voltage and mini-
mal extension cords will allow threading 2″ pipe
at 45 RPM. If the machine stalls due to low volt-
age, complete the thread at 16 RPM. On 15
amp circuits, 1
1
/
2
″ – 2″ pipe must be threaded at
16 RPM.
NOTE! Failure to select proper speed may result in
motor stalling under low voltage conditions.
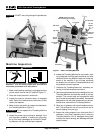
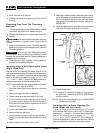
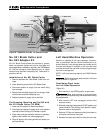
5. Turn carriage handwheel to bring dies against end of
pipe. Slight pressure on handwheel will start dies
(Figure 10).
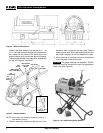
Figure 10 – Threading Pipe with No. 815A Die Head
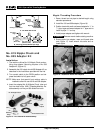
6. Self-Opening 815A Die Head (Figure 11) – When die
head trigger contacts end of pipe, throwout lever is
automatically opened.
NOTE! For
1
/
2
″ to 2″ pipe, die head will open automati-
cally when proper length of thread has been cut.
For
1
/
8
″,
1
/
4
″ and
3
/
8
″ pipe, die head must be
opened manually.
Quick-Opening 811A Die Head (Figure 12) – When
the end of pipe being threaded is flush with the end of
the Number 1 die, rotate throwout lever to OPEN
position, retracting dies.
Semi-Automatic Die Head (Figure 13) – When the
end of the pipe being threaded is flush with the end of
the Number 1 Die, hit the handle to release the dies
from the pipe.
7. Turn carriage handwheel to back die head off pipe.
1822-I Pipe and Bolt Threading Machine
Reamer
Handwheel
Handwheel
Throwout
Lever
Self-Opening
Die Head
Trigger
Assembly
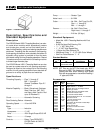
Speed Selection Chart
Size/Material Recommended RPM
1
/
8
″ – 2″ Pipe 45
1
/
4
″ – 1″ Bolt 45
High Torque Applications 16
• Stainless Steel
• Bolt Above 1″
Low Voltage Conditions 16