


• Depress and hold the foot switch. Inspect the mov-
ing parts for misalignment, binding, odd noises or
any other unusual conditions that may affect the
safe and normal operation of the machine. If such
conditions are present, have the machine serviced.
• Flip the control switch to OPEN. Press and release
the foot switch. Check that the Threading Machine
rotates in a clockwise direction as you are facing
the chuck.
• Release the foot switch and flip the control switch
to OFF.
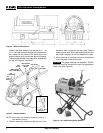
Operation Using
Machine-Mounted Tools
WARNING
Do not wear gloves or loose clothing when oper-
ating Threading Machine. Keep sleeves and jack-
ets buttoned. Do not reach across the machine,
pipe, or inside chuck openings.
Do not use this Threading Machine if the foot switch
is broken or missing. Always wear eye protection to
protect eyes from dirt and other foreign objects.
Keep hands away from rotating pipe and fittings.
Stop the machine before wiping pipe threads or
screwing on fittings. Allow the machine to come to
a complete stop before touching the pipe.
Do not use this machine to “make-on” or “break
off” fittings. This practice is not an intended use of
this Threading Machine.
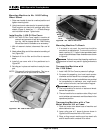
Installing and Chucking Pipe In
Threading Machine:
1. Check to insure the cutter, reamer and die head are
in the UP position.
2. Mark the pipe at the desired length if it is being cut to
length.
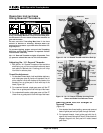
3. Place speed selector in 45 RPM position.
4. Insert the pipe into the Threading Machine so that the
end to be worked or the cutting mark is located a suf-
ficient distance to complete desired operation.
5. Insert workpieces less than 2 feet long from the front
of the machine. Insert longer pipes through either
end so that the longer section extends out the rear of
the Threading Machine.
Ridge Tool Company
10
To avoid equipment tip-overs, position
the pipe supports under the workpiece.
6. Place the control switch in the CLOSE position and
step on machine’s foot switch. The machine will au-
tomatically center and grip the pipe or bolt stock.
NOTE! If pipe is chucked off-center, run the machine in
the OPEN switch position to release pipe and
rechuck. Slight off-center chucking can be cor-
rected with a normal ream or cut-off operation.
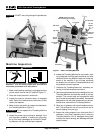
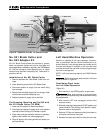
Cutting Pipe with No. 364 Cutter
1. Swing reamer and die head to UP position.
2. Move pipe cutter DOWN onto pipe and move carriage
with handwheel to line up cutter wheel with mark on
pipe.
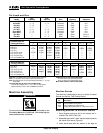
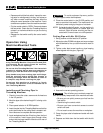
3. Tighten cutter feed screw handle on pipe keeping
wheel aligned with the pipe (Figure 8).
Figure 8 – Cutting Pipe with 364 Cutter
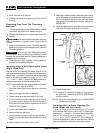
4. Assume the correct operating posture.
This will allow you to maintain proper bal-
ance and to safely keep control of the machine and tools.
• Be sure you can quickly remove your foot from the
foot switch.
• Stand facing the control switch.
• Be sure you have convenient access to control
switch and tools.
• Do not reach across the machine or workpiece.
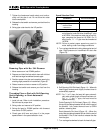
5. Grasp the pipe cutter’s feedscrew handle with both
hands.
6. Depress and hold down the foot switch with the left
foot.
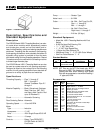
1822-I Pipe and Bolt Threading Machine
View Angle
Cutter
Handwheel
Feedscrew
Handle
WARNING
WARNING