


C3662M (6/08) 35
CONFIGURING AND TESTING ODBC CONNECTIVITY
1. Log on to Windows using the “dsserviceuser” account.
2. From the Start menu, select Settings and Control Panel.
3. Open Administrative Tools.
4. Open Data Sources (ODBC).
5. Select the System DNS tab.
6. Click the Configure button.
7. Enter or verify the name of the database to which you want to connect (Digital Sentry), its description, and its host server name. Click Next.
8. Choose Windows NT authentication. Click Next.
9. Verify that Digital Sentry is the default database and click Next.
10. Click Finish.
11. Click Test Data Source. The following message appears if ODBC is configured correctly:
TESTS COMPLETED SUCCESSFULLY!
12. Click OK to close the windows. Do not click Cancel.
If the test fails, perform the following troubleshooting procedures:
• Verify that the local computer can communicate with the server. Refer to Testing a Network Connection on page 47.
• Verify that the database has been properly installed on the server.
SYSTEM AND DISPLAY REQUIREMENTS FOR CLIENT COMPUTERS
RULES FOR CACHING ON DIGITAL SENTRY CLIENT COMPUTERS
Digital Sentry client software (not DS ControlPoint) uses 2 GB of available space on the system disk, or 70 percent of the available space if less
than 2 GB. Users can change the cache size in the client computer’s Registry using the following path:
HKEY_LOCAL_MACHINE-->SOFTWARE-->Integral Technologies, Inc.-->Digital Sentry-->DSCacheMB
Users can increase the DSCacheMB parameter to conserve bandwidth or decrease the parameter to conserve limited disk space. A file equal to
the size of the cache is created in the Temp directory.
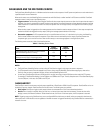
Table B. Client Computer System and Display Requirements
Minimum Recommended
Memory 512 MB 2 GB
Processor Pentium
®
4 2.4 GHz with Hyper-Threading Intel
®
Core
™
2 Duo 2.4 GHz
Graphics card Compatible with DirectX
®
9, 128 MB Compatible with DirectX 9, 256 MB
Operating system Windows XP Home, Windows Vista
®
Windows XP Professional SP2