


20 C3662M (6/08)
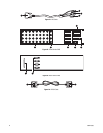
Figure 15. DS RealVue XPress Audio Connector
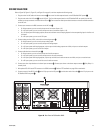
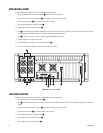
DS REALVUE DESKTOP INSTALLATION
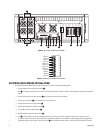
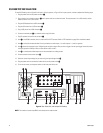
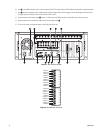
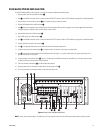
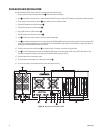
Refer to Figure 16, Figure 17and Figure 18 on page 21 to install DS RealVue Desktop. Then complete the following steps:
1. Plug the power cord into the power connector
ì.
2. Plug a monitor into a monitor connector
î and its power cord into an electrical outlet. The top connector is for a VGA monitor, and the
bottom connector is for a DVI monitor.
3. Plug the USB keyboard into a USB connector ï.
4. Plug the USB mouse into a USB connector ñ.
5. Plug a USB printer into a USB connector ó.
6. Connect the network port r to a network switch using Cat5 cable.
7. Plug PC speakers into the line out connector
s.
8. Item t is the COM5 connector, which is used to connect RS-422 PTZ cameras using the TX+ and TX– pins.
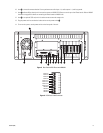
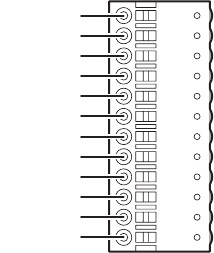
9. Item u is the audio connector bracket. From top to bottom are audio inputs 1–4, ground, audio inputs 5–8, ground, audio inputs 9–12,
ground, audio inputs 13–16, ground.
10. Item ~í shows the connector for the 16 digital inputs and alarm output. Wire your alarm triggers into the input trigger block and connect
the signal ground to a GND pin. Refer to Figure 18 on page 21 for pinout/connector information.
11. Connect analog monitors to the two video output connectors ~â.
12. Connect cameras to the camera inputs
~ä.
13. Select the correct input voltage for your area using the input voltage switch ~ã.
14. Plug the power cord into an electrical outlet and turn on the power switch
~å.
15. To turn on the server, use the power switch on the front panel of the unit.
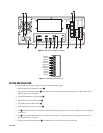
GROUND 4
GROUND 3
GROUND 2
GROUND 1
AUDIO OUT 4
AUDIO OUT 3
AUDIO OUT 2
AUDIO OUT 1
AUDIO IN 4
AUDIO IN 3
AUDIO IN 2
AUDIO IN 1