


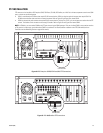
22 C3662M (6/08)
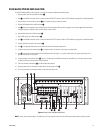
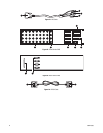
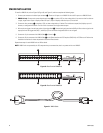
DS REALVUE RAID INSTALLATION
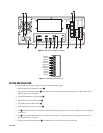
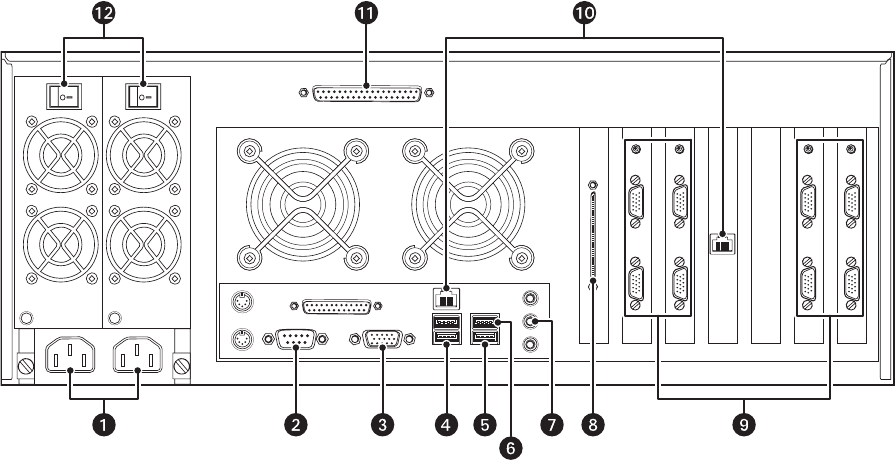
To install DS RealVue RAID, refer to Figure 19, and then complete the following steps:
1. Plug the power cords into the power connectors
ì. Both cords must be connected.
2. Item î is the COM1 connector, which is used to connect RS-232 PTZ cameras. Refer to PTZ Installation on page 29 for installation details.
3. Plug a monitor into the monitor connector ï and its power cord into an electrical outlet.
4. Plug the USB keyboard into a USB connector ñ.
5. Plug the USB mouse into a USB connector ó.
6. Plug a USB printer into a USB connector r.
7. Plug PC speakers into the line out connector s.
8. Item t is a SCSI card, which is used to connect to external storage units.
9. Item
u is the video capture board, which is used to connect the DS RealVue RAID system to the camera inputs on an XIO unit using the XIO
cable. Up to four video capture boards can be installed in the DS RealVue RAID system. Refer to XIO Installation on page 23 for details on
connecting the DS RealVue RAID system to an XIO unit.
10. Connect one or both of the network ports
~í to a network switch, IP cameras, and so forth using Cat5 cable.
11. Item ~â is a DB-37 connector that connects the DS RealVue RAID system to the alarm panel on XIO using a DB-37 cable. Refer to XIO
Installation on page 23 for details on connecting the DS RealVue RAID system to an XIO unit.
12. Plug the power cord into an electrical outlet.
13. To provide power to the system, turn on both power switches
~ä.
14. To turn on the system, use the power switches on the front panel of the unit.
Figure 19. Rear Panel of DS RealVue RAID