


6
C
ONFIGURING THE
MX001
FOR
115
OR
230
V
OLT
O
PERATION
USA: 115V Operation (continued)
6. Press the end of the 1/8 Amp fuse into the other gray fuse holder cap unitl it
seats.
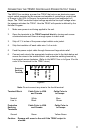
7. Insert the fuse and cap into the F2 control fuse holder with the screwdriver
slot pointing toward the power transformer.
8. Using a small screwdriver, press the cap down into the fuse holder body and
turn the cap ¼ turn clockwise to the lock the cap in place. This results in the
cap slot pointing toward the top and bottom of the box.
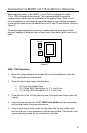
USA: 230V Operation
1. Move the voltage selector to the left with a small screwdriver so that the
230V legend shows in the window.
2. Open the fuse kit and remove the following:
• (2) Gray Fuse Holder Caps
• (1) 10 Amp 250V Fast Acting ¼ x 1 ¼ Inch Fuse
• (1) 1/16 Amp 250V Slow Blow ¼ x 1 ¼ Inch Fuse
3. Press the end of the 10 Amp fuse into one of the gray fuse holder caps until
seals.
4. Insert the fuse and cap into the F1 TRIAC fuse holder with the screwdriver
slot pointing toward the power transformer.
5. Using a small screwdriver, press the cap down into the fuse holder body and
turn the cap ¼ turn clockwise to lock the cap in place. This results in the cap
slot pointing toward the top and bottom of the box.
6. Press the end of the 1/16 Amp fuse into the other gray fuse holder cap until
it seats.
7. Insert the fuse and cap into the F2 control fuse holder with the screwdriver
slot pointing toward the power transformer.
8. Using a small screwdriver, press the cap down into the fuse holder body and
turn the cap ¼ turn clockwise to lock the cap in place. This results in the cap
slot pointing toward the top and bottom of the box.