


31
NOTE
The following steps are for adjusting the discharge
air setting. The discharge air temperature setting is
factory set to the recommended 70ºF. Only adjust
the setting if needed.
NOTE
After modifying a setting, the Enter key must be
pressed to save the change. If the Enter key is not
pressed the display will return to the Setpoints
Menu without saving the change.
NOTE
Steps 9 thru 10 are provided for adjusting the inlet
air set point. The inlet air sensor is preset to the
factory recommended 60ºF, only adjust if needed.
NOTE
The inlet air sensor monitors the temperature of
the inlet air. If the inlet air is above the sensor’s set
point, the inlet air sensor shuts off the furnace and
continues to supply the warm outside air.
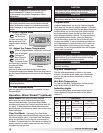
11. Access the Room Override Setting
From the Setpoints Menu, use the Up or Down key to
navigate through the menu
options until the display
reads “rot.” Once the display
reads “rot,” press the Enter
key. The display will change
to the room override setting.
NOTE
Steps 11 and 12 are provided for adjusting the room
override setting. Only adjust the setting if the room
override function is desired.
NOTE
The room override function temporarily changes
the discharge air temperature to the room override
setting if a room thermostat is not satisfied.
NOTE
The room override function requires a field-supplied
thermostat to be installed in the space and to be
wired between terminal 31 and 32 in the unit’s
control center.
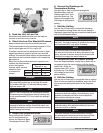
9. Access the Inlet Air Sensor Setting
From the Setpoints Menu, use the Up or Down key to
navigate through the menu options until the display
reads “iAS.” Once the display
reads “iAS”, press the Enter
key. The display will change
to the inlet air sensor setting.
10. Edit the Setting
Use the Up or Down key to edit the inlet air setting.
When the correct setting is displayed, press the Enter
key to save the setting and return to the Setpoints
menu.
12. Edit the Setting
Use the Up or Down key to change the room override
setting. When the correct setting is displayed, press
the Enter key to save the setting and return to the
Setpoints menu.
NOTE
After modifying a setting, the Enter key must be
pressed to save the change. If the Enter key is not
pressed the display will return to the Setpoints
Menu without saving the change.
Note: If the valve remains in the low fire setting mode
for more than five (5) minutes, it will revert back to its
previous setting.
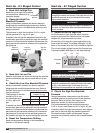
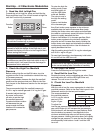
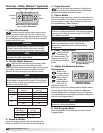
6. Access the Setpoints Menu
Press and hold the Function
key for three seconds to
access the Setpoints Menu.
The display will read “SEt”
when Setpoints Mode is
active.
7. Access the Discharge Air
Temperature Setting
Use the Up or Down keys to
scroll through the Setpoints
Menu options until the
display reads “dtS” then
press the Enter key. The display will change to the
discharge air temperature setting.
8. Edit the Setting
Use the Up or Down keys to change the discharge
air temperature setting. When the correct setting is
displayed, press the Enter key to save the setting and
return to the Setpoints Menu.
®
Model IG / IGX Make-Up Air