


27
MODEL SOLU COMP II SECTION 4.0
DISPLAY AND OPERATION
4.3 PROGRAMMING AND CALIBRATING THE SOLU COMP II
- TUTORIAL
Setting up and calibrating the Solu Comp II is easy. The following tutorial
describes how to move around in the programming menus. For practice, the
tutorial also describes how to assign conductivity values to the 4 and 20 mA
outputs for sensor 1.
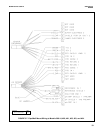
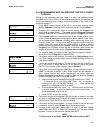
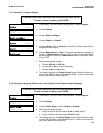
1. If the MENU screen (shown at the left) is not already showing, press
MENU. Calibrate is blinking, which means the cursor is on Calibrate.
2. To assign pH or conductivity values to current outputs, the Program sub-
menu must be open. Press . The cursor moves to Program (Program
blinking). Press ENTER. Pressing ENTER opens the Program sub-menu.
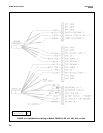
3. The Program sub-menu permits the user to set outputs, alarms, auto-
matic or manual temperature compensation, and a security code. When
the sub-menu opens, Outputs is blinking, which means the cursor is on
Outputs. Press or (or any arrow key) to move the cursor around the
display. Move the cursor to >> and press ENTER to cause a second
screen with more program items to appear. There are three screens in the
Program menu. Pressing >> and ENTER in the third screen causes the
display to return to the first screen (Outputs, Alarms, Measurement).
4. For practice, assign pH values to the 4 and 20 mA outputs for sensor 1.
Move the cursor to Outputs and press ENTER.
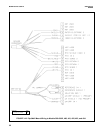
5. The screen shown at left appears. The cursor is on Output Range (blink-
ing). Output range is used to assign values to the low and high current out-
puts. Press ENTER.
6. The screen shown at left appears. The Solu Comp II has two outputs, out-
put 1 and output 2. Move the cursor to the desired output and press
ENTER. For purposes of the example, choose Output 1.
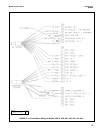
7. The screen shown at left appears. Out1 S1 in the top line means output 1
(Out1) is assigned to sensor 1 (S1). Either output can be assigned to
either sensor (sensor and output assignments are made under the
Output Configure menu shown in step 5). Use the Out1 S1 Range?
screen to assign a pH value to the 4 mA output.
a. Use the arrow keys to change the pH to the desired value. Press or
to move the cursor from digit to digit. Press or to increase or
decrease the value of the digit. Holding or down causes the
numeral to continuously scroll up or down.
b. To move the decimal point, press or until the cursor is on the dec-
imal point. Press to move the decimal point to the right. Press to
move the decimal point to the left.
c. Press ENTER to store the setting.
8. The screen shown at left appears. Use this screen to assign a full scale
pH value to the 20 mA output. Use the arrow keys to change the pH to the
desired value. Press ENTER to store the setting.
9. The screen shown at left appears. To assign values to the low and high
currents for output 2, select Output 2 and follow the prompts.
10. To return to the main menu, press MENU. To return to the main display
press MENU then EXIT, or press EXIT repeatedly until the main display
appears. To return to the previous display press EXIT.
NOTE
To store values or settings, press ENTER before pressing EXIT.
CCaalliibbrraattee
Hold
Program Display
Calibrate Hold
PPrrooggrraamm
Display
OOuuttppuuttss
Alarms
Measurement >>
OOuuttppuutt RRaannggee
Output Configure
Output Range?
OOuuttppuutt11
Output2
Out1 S1 Range?
4mA
00
.00pH
Out1 S1 Range?
20mA
11
4.00pH
Output Range?
OOuuttppuutt11
Output2