


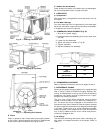
CARE AND MAINTENANMCE
To ensure continuing high performance and to minimize the
possibility of premature equipment failure, periodic mainte-
nance must be performed on this equipment. This combina-
tion heating/cooling unit should be inspected at least once each
year by a qualified service person.
NOTE TO EQUIPMENT OWNER: Consult your local dealer
about the availability of a maintenance contract.
WARNING:
The ability to properly perform mainte-
nance on this equipment requires certain expertise, me-
chanical skills, tools, and equipment. If you do not pos-
sess these, do not attempt to perform any maintenance
on this equipment other than those procedures recom-
mended in the User’s Manual. FAILURE TO HEED
THIS WARNING COULD RESULT IN SERIOUS PER-
SONAL INJURY AND POSSIBLE DAMAGE TO THIS
EQUIPMENT.
The minimum maintenance requirements for this equipment
are as follows:
1. Inspect air filter(s) each month. Clean or replace when
necessary.
2. Inspect cooling coil, drain pan, and condensate drain each
cooling season for cleanliness. Clean when necessary.
3. Inspect fan motor and wheel for cleanliness and check
lubrication each heating and cooling season. Clean and
lubricate (if required) when necessary.
4. Check electrical connections for tightness and controls
for proper operation each heating and cooling season.
Service when necessary.
5. Check and inspect heating section before each heating
season. Clean and adjust when necessary.
6. Check and clean vent screen if needed.
WARNING:
Failure to follow these warnings could re-
sult in serious personal injury:
1. Turn off gas supply, then turn off electrical power
to the unit before performing any maintenance or
service on the unit.
2. Use extreme caution when removing panels and
parts. As with any mechanical equipment, per-
sonal injury can result from sharp edges, etc.
3. Never place anything combustible either on, or in
contact with, the unit.
4. Should overheating occur, or the gas supply fail to
shut off, shut off the external main manual gas
valve to the unit, then shut off the electrical
supply.
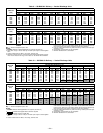
I. AIR FILTER
CAUTION:
Never operate the unit without a suitble
air filter in the return-air duct system. Always replace
the filter with the same dimensional size and type as
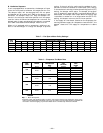
originally installed. See Table 1 for recommended filter
sizes.
Inspect air filter(s) at least once each month and replace
(throwaway-type) or clean (cleanable-type) at least twice dur-
ing each heating and cooling season and whenever the fil-
ter(s) becomes clogged with dust and lint.
When necessary, replace filters with the same dimensional
size and type as originally provided.
SERVICE
CAUTION:
When servicing unit, shut off all electri-
cal power to unit to avoid shock hazard or injury from
rotating parts.
I. CLEANING
Inspect unit interior at the beginning of each heating and cool-
ing season and as operating conditions require.
A. Evaporator Coil
1. Turn unit power off. Remove evaporator coil access panel.
2. If economizer is installed, remove economizer by dis-
connecting economizer plug and removing mounting
screws. See Fig. 18 and 19. Refer to Accessory Econo-
mizer Installation Instructions or Optional Economizer
sections on pages 13 and 14 for further details.
3. Slide filters out of unit.
4. Clean coil using a commercial coil cleaner or dish-
washer detergent in a pressurized spray canister. Wash
both sides of coil and flush with clean water. For best
results, backflush toward return-air section to remove
foreign material.
5. Flush condensate pan.
6. Reinstall economizer and filters.
7. Reconnect wiring.
8. Replace access panels.
B. Condenser Coil
Inspect coil monthly. Clean condenser coil annually, and as
required by location and outdoor-air conditions.
One-Row Coil (size 036)
Wash coil with commercial coil cleaner. It is not necessary to
remove top panel.
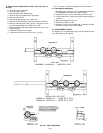
2-Row Coils (sizes 048-072)
NOTE: Save all screws removed in this section. The screws
must be used when reinstalling the equipment.
1. Turn off unit power.
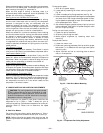
2. Remove top panel screws on condenser end of unit.
3. Remove condenser coil corner post. See Fig. 35. To hold
top panel open, place coil corner post between top panel
and center post. See Fig. 36.
4. Remove screws securing coil to center post.
5. Remove fastener holding coil sections together at re-
turn end of condenser coil. Carefully separate the outer
coil section 3 to 4 in. from the inner coil section. See
Fig. 37.
6. Use a water hose or other suitable equipment to flush
down between the 2 coil sections to remove dirt and de-
bris. Clean the outer surfaces with a stiff brush in the
normal manner.
7. Secure inner and outer coil rows together with a field-
supplied fastener.
8. Reposition the outer coil section and remove the coil cor-
ner post from between the top panel and center post.
9. Reinstall the coil corner post and replace all screws.
C. Condensate Drain
Check and clean each year at start of cooling season. In win-
ter, keep drain dry or protect against freeze-up.
—28—