


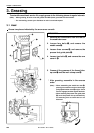


Chapter 9 Maintenance
BES-962BC • BES-1262BC
228
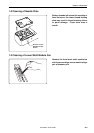
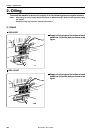
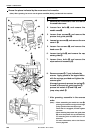
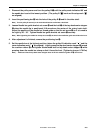
BES-962BC
1. Remove two connectors from the rear of
the needle bar case.
2. Loosen four bolts q, and remove the
needle case w.
3. Loosen three screws e, and remove the
presser foot guide plate r.
4. Loosen two screws t, and remove the arm
cover L y.
5. Loosen four screws u, and remove the
head cover i.
6. Loosen two bolts o, and remove the cap
eaves guide !0.
7. Loosen three bolts !1, and remove the
wiper solenoid assembly !2.
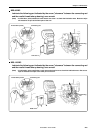
8. Remove screws !3 (7 pcs) indicated by
arrows. Apply grease to the tapped holes
with the syringe provided and tighten the
screws again.
Also apply grease to presser bar spring !4,
the end of presser bar guide bracket !5,
presser bar metals U !6 and D !7, and
jump rotary shaft !8.
* After greasing, assemble in the reverse
order.
(Note) • When assembling the needle bar case w,
place it on the machine and turn the change
pulley @0 behind the cover !9 at right.
Check that it is engaged, and then tighten
the bolts.
• When attaching the presser foot guide plate
r, move the presser foot up and down by
the retracting lever to check that is it not
distorted.
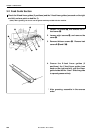
For more information, refer to the illustra-
tion on page 226.
w
r
o
q
i
u
u
!1
!2
y
t
o
!0
e
w
!9
@0
r
!3
!3
!3
!3
!3
!3
!4
!6
!5
!7
!3
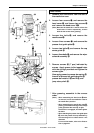
Grease the places indicated by the arrow once in six months.
(Note) When greasing, be sure to use the grease tank BR2 (black) provided with the machine.
!8