


2
Please Do Not Return This Product To The Store. Call Us Directly! Our Trained Technicians Will Answer Your Questions and/or Ship Any Parts You May Need.
You can reach us Toll Free at 1-888-827-3667 for Consumer Assistance or online at www.wayne-dalton.com
R3
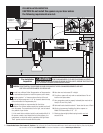
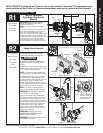
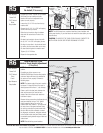
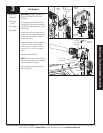
End Bracket Removal
To remove end brackets, start with the right
hand end bracket and remove the lower lag
screw and carriage bolt.
Repeat for left hand end bracket.
CAUTION: THE WINDING SHAFT MAY
ROTATE WHEN REMOVING THE END
BRACKET AND GEAR.
Tools Needed:
Power Drill
7/16” Socket
Driver
1/2” Wrench
Step Ladder
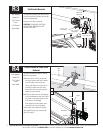
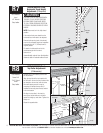
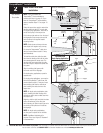
Center Bracket & Cable Drum
Removal
To remove the cable drum/center bracket,
follow the steps below:
a. Remove the two 1/4" lag screws from
the center bracket. slide center bracket
to the right side of the torque tube.
Lift the right side of the torque tube up
and slide the cable drum and center
bracket off the end of the torque tube.
discard the center bracket.
b. Drape the cable drum over the flagangle
by the counterbalance cable and re-align
the groove in the winding shaft with the
round notch in the flagangle.
Once aligned, lower the winding shaft
and torque tube onto the flagangle.
Repeat cable drum removal for left side.
After completing this step, continue with
Step R5 on page 5.
R4
a
b
1/4”
Lag Screws
Center
Bracket
Torque
Tube
Tools Needed:
Power Drill
7/16" Socket
Driver
Step Ladder
Cable Drum
No space between Ratchet
Pawl and Cable Drum
indicates engagemen
t
Cable Drum
Ratchet Pawl
ENGAGED SIDE VIEW
No space between
Ratchet Pawl and
Cable Drum
ENGAGED U
NDE
RNE
ATH V
IEW
Space between Ratchet Pawl
and Cable Drum
non-indicates engagement
Cable Drum
Ratchet Pawl
DISENGAGED SIDE VIEW
No space between
Ratchet
Pawl and
DISENGAGED U
NDER
NE
A
T
H V
IEW
UPPER POSITION
LOWER POSITION
LOWER POSITION SIDE VIEW
UPPER POSITION SIDE VIEW
Ratchet Pawl in Lower Position
Ratchet Pawl in Upper Position
Use these Illustration, in conjunction with the Instructions on the other side of
this label.
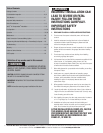
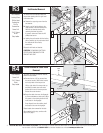
WARNING
WA
RNI
NG
Rachet Bracket is under
Rachet
Bra
cke
t
i
s
un
de
r
EXTREME SPRING
EXTR
EME SPR
IN
G
TENSION
TENSION
.
To avoid possible severe or
T
o avoi
d poss
i
ble sever
e or
fatal injury,
fatal
i
njur
y
,
DO NOT
D
O
N
O
T
remove
r
em
ove
fasteners from ratchet bracket
f
astene
r
s
f
r
om ratchet br
ack
et
until spring(s) are fully
un
ti
l
spr
i
ng
(
s)
ar
e full
y
wnwound.
wnwound
.
To safely unwind spring(s)
To safely
un
w
i
nd spr
i
ng
(
s)
read
r
ead
and follow the directions in the
and f
oll
ow
t
he
dir
ecti
on
s in
the
installation instructions/owners
i
nstal
l
ation
i
nstru
ct
i
on
s/ow
ners
manual.
m
an
ual
.
DO NOT REMOVE THIS TAG.
D
O
N
OT REMOV
E TH
I
S TA
G
.
5/16” X 1-5/8”
Hex Head Lag
End Bracket
(Right Hand)
5/16”-18 Hex Nut
5/16” - 18 X 3/4”
Carriage Bolt
Winding Shaft
Cable
Drum
Groove
Round Notch
Flagangle
Splines