


1
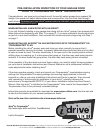
Please Do Not Return This Product To The Store. Call Us Directly! Our Trained Technicians Will Answer Your Questions and/or Ship Any Parts You May Need.
You can reach us Toll Free at 1-888-827-3667 for Consumer Assistance or online at www.wayne-dalton.com
R2
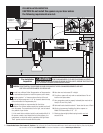
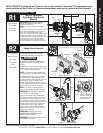
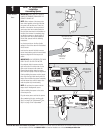
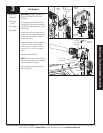
Spring Tension Removal
Counterbalance spring tension must be
relieved before removing any hardware.
A POWERFUL SPRING RELEASING ITS
ENERGY SUDDENLY CAN CAUSE SEVERE
INJURY.
Starting with the right hand side, ensure pawl
knob is in upper position. Place a ratchet with
a 5/8” socket on the winding shaft.
NOTE: A 3” extension is also recommended
for added clearance from the horizontal angle.
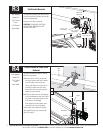
To remove spring tension, ensure the ratchet
and socket is set so that it will add tension
(counter clockwise) on the right hand side and
(clockwise) on the left hand side. Rotate
ratchet to relieve pressure between the pawl
and the ratchet wheel. Push in on the pawl to
allow the ratchet wheel teeth to pass by.
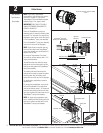
NOTE: In the event of a broken spring, it
might not be necessary to unwind spring(s).
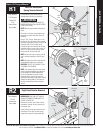
IMPORTANT! BE PREPARED TO HOLD THE
FULL TENSION OF THE SPRING.
Gently let the ratchet rotate upward, while
watching the number of teeth on the ratchet
wheel pass by the pawl. Remove 3/10 of a
turn (watch the 3 teeth of the ratchet wheel
pass the pawl). Release the pawl to allow it to
engage with the ratchet wheel. Repeat this
process until all spring tension has been
removed from spring(s). Cables should be
loose and the torque tube should be free to
rotate in either direction.
IMPORTANT! SPRING(S) ARE FULLY
UNWOUND WHEN COUNTERBALANCE
CABLES HAVE NO TENSION.
IMPORTANT! DO NOT USE AN IMPACT GUN
TO UNWIND THE SPRINGS.
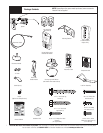
Tools Needed:
Ratchet Wrench
5/8” Socket
3” Extension
Gloves
Step Ladder
INSTALLATION NOTICE: If installing the
i
drive
®
opener on a door currently installed with Torquemaster
®
Plus counterbalance system,
start the installation with Step: R1 below. For Torquemaster
®
counterbalance system, start the installation with Step R1 on page 3.
Pawl Knob In Upper Position
END BRACKET
Pawl Knob In Lower Position
END BRACKET
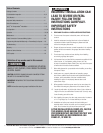
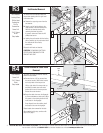
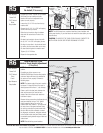
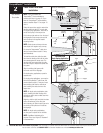
R1
Retro-Fit Installation
Drum Wrap & End Bracket
Removal
IMPORTANT! RIGHT AND LEFT HAND IS
ALWAYS DETERMINED FROM INSIDE THE
BUILDING LOOKING OUT.
NOTE: Warning tag removed for illustration
clarity.
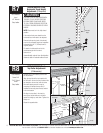
Starting on the right hand side, unlock the drum
wraps from the cable drums. Un-snap hinged
latch. PULL COUNTERBALANCE CABLE
SLIGHTLY OUTWARD FROM THE JAMB to allow
hinged latch to pass to the left of the cable. Pry
radially outward with a small screwdriver on the
three tabs (one at a time) while maintaining
pressure on drum wrap in direction shown to
remove. Repeat drum wrap removal for left side.
Tools Needed:
Step Ladder
Flat Blade
Screwdriver
Retro-Fit TorqueMaster
®
Plus
Drum Wrap
Drum
WARNING
Ratchet
RIGHT HAND SIDE
LEFT HAND SIDE
Marks
3” Extension
Pawl
Marks
3” Extension
Ratchet
TORQUEMASTER
®
PLUS END BRACKET
(Right hand shown, left hand bracket symmetrically opposite)
PAWL KNOB
IN UPPER POSITION
PAWL KNOB
IN LOWER POSITION
Pawl
Ratchet Wheel
PAWL
RATCHET PAWL
RATCHET WHEEL
Pushing in on Pawl Causes
Ratchet Pawl to move away
from Ratchet Wheel, allowing
wheel teeth to pass by.
RETRO-FIT TORQUEMASTER
®
PLUS
Before
After
Tab x 3
Counterbalance
Cable
Counterbalance
Cable
Hinged Latch
Hinged Latch