


27
Please Do Not Return This Product To The Store. Call Us Directly! Our Trained Technicians Will Answer Your Questions and/or Ship Any Parts You May Need.
You can reach us Toll Free at 1-888-827-3667 for Consumer Assistance or online at www.wayne-dalton.com
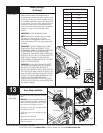
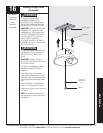
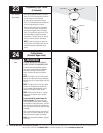
PRE-OPERATION
S1 S2 S3 S4
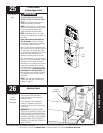
Learn Delete
Controls
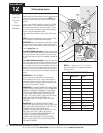
w
w
w
.
W
ayne-Dalt
on.com/access
Fin
d
out
mor
e:
what’s
OPENING
your world?
Wi
th Z
-Wa
ve
®
technolo
gy you can
control
your lights,
t
hermostat and star t
your morning
coffee,
all with the single
t
o
uch of a butto
n.
P/
N
33598
2
Z-
Wave
®
enabled
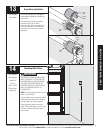
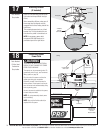
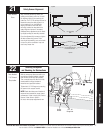
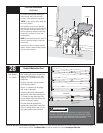
With the emergency disconnect still in the
manual door operated position, manually
raise the door to the fully open position.
Then, manually lower the door to the fully
closed position verifying freedom of
movement and good door balance.
Tighten both 1/4”-20 flange nuts, securing
the opener to the support bracket.
NOTE: Good door balance and freedom of
movement are essential for proper opener
performance. If door is heavy to lift, hard to
close or if door sticks or binds in
the track, make proper adjustments now.
Securing the Opener
and Checking for Obstructions
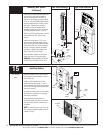
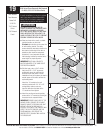
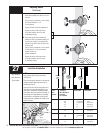
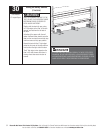
Align the safety sensors by moving the
sending and receiving units in or out until
the alignment light on the receiving unit
comes on. The 1/4”-20 carriage bolt can be
loosened to move the safety sensor in or
out, as required. If you have difficulty
aligning the beams, check that both
mounting brackets are mounted at the
same height and remount if necessary.
Additional minor adjustments can be made
by slightly bending the mounting brackets.
Once the alignment light comes on, tighten
all bolts and mounting screws. Finish
securing all wires making sure not to break
or open any of the conductors. Loop and
secure any excess wire.
Safety Sensor Alignment
1/4”-20 Carriage
Bolts
In
Out
In
Out
Top View
Top View
For this adjustment, bend
Bracket at wall mount
1/4” - 20
Flange Nuts
Support
Bracket
Tools Needed:
Pliers
21
22
Tools Needed:
7/16” Wrench
Step Ladder