


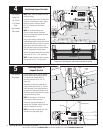
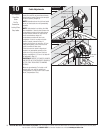
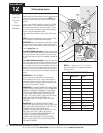
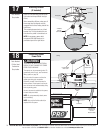

Setting Spring Tension
See chart below for proper spring tension setting.
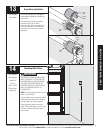
Beginning with the right hand side, ensure the counterbalance
cable is in the first groove of the cable drum.
NOTE: Apply
light pressure to the canoe clip on counter while winding
springs.
Using a power drill (high torque/gear reduced to 1300 RPM
preferred) with a 7/16" socket driver, carefully rotate right
hand winding bolt clockwise, until counter shows 2-3 turns.
This will keep the counterbalance cable taut while adjusting
the left hand side counterbalance cable.
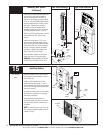
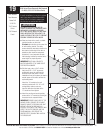
Adjust left hand counterbalance cable tension (Refer to step
10).
NOTE: Single spring applications require no spring winding
on left hand side, but need cable tension adjusted.
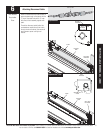
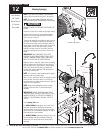
IMPORTANT! Ensure counterbalance cable tension is equal
for both sides prior to fully winding spring(s) to appropriate
number of turns. If cable tension is unequal, refer to Step 10.
See the Spring Turn chart.
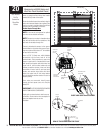
For SINGLE SPRING applications, return to the right hand
side and carefully rotate the winding bolt head clockwise until
the counter shows the correct number of turns for your door
or the number record during the Pre-Installation Inspection on
page II.
For DOUBLE SPRING applications, remain on the left hand
side and carefully rotate the winding bolt head clockwise until
the counter shows the correct number of turns for your door
or the number record during the Pre-Installation Inspection on
page II. Then return to the right hand side and wind the right
hand spring to the required number of turns for your door or
the number recorded during the Pre-Installation inspection on
page II.
IMPORTANT! DO NOT OVERWIND.
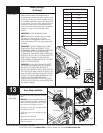
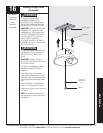
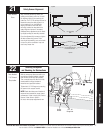
After spring is wound, hold the lock nut (in back of end
bracket) stationary with a 7/16" wrench while rotating the
winding bolt clockwise until snug. Tightening of the lock nut
prevents spring from unwinding. Repeat for opposite side on
double spring Torquemaster
®
systems.
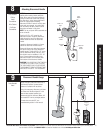
IMPORTANT! CAUTIOUSLY REMOVE VICE CLAMPS FROM
VERTICAL TRACKS. ADJUSTMENTS TO THE RECOMMENDED
NUMBER OF TURNS MAY BE REQUIRED. IF DOOR RAISES
OFF THE FLOOR UNDER SPRING TENSION ALONE, THEN
REDUCE SPRING TENSION UNTIL DOOR RESTS ON THE
FLOOR. IF THE DOOR IS HARD TO RAISE OR DRIFTS DOWN
ON ITS OWN, THEN ADD SPRING TENSION. AN
UNBALANCED DOOR CAN CAUSE IDRIVE
®
OPERATION
PROBLEMS.
IMPORTANT! IF YOU ARE INSTALLING THE IDRIVE
®
OPENER ON A NEW GARAGE DOOR, REAR SUPPORTS WILL
NEED TO BE FABRICATED/ INSTALLED TO SUPPORT THE
HORIZONTAL TRACKS. REAR SUPPORTS ARE
CONSTRUCTED USING PERFORATED ANGLES, HEX HEAD
BOLTS/NUTS AND THEN THE MUST BE SECURELY
ATTACHED TO SOUND FRAMING MEMBERS WITH LAG
SCREWS. FOR DETAILED INFORMATION ON
CONSTRUCTING/ SUPPORTING THE REAR SUPPORTS,
REFER TO YOUR DOORS INSTALLATION INSTRUCTIONS
AND OWNER’S MANUAL.
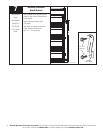
RECOMMENDED SPRING TURNS
Door Height Doors 11’-11”
Wide or Less
Doors 12’ Wide or
Greater
6’-0” 13-1/2 14
6’-3” 14 14-1/2
6’-5” 14-1/2 15
6’-6” 14-1/2 15
6’-8” 15 15-1/2
6’-9” 15 15-1/2
7’-0” 15-1/2 16
7’-3” 16 16-1/2
7’-6” 16-1/2 17
7’-9” 17 17-1/2
8’-0” 17-1/2 18
NOTE: For 7’ high doors, 8’, 9’, 10’, 16’ or 18’
wide with windows, the recommended number of
spring turns is 15.
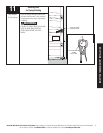
Tools Needed:
Power Drill
7/16" Socket
Driver
7/16" Wrench
Step Ladder
Canoe Clip
Winding
Bolt
Power
Drill
7/16”
Socket
Driver
15.5
Counter
(Sample Setting)
Winding
Bolt
Canoe Clip
12
TorqueMaster
®
7/16”
Wrench
Lock Nut
20
Please Do Not Return This Product To The Store. Call Us Directly! Our Trained Technicians Will Answer Your Questions and/or Ship Any Parts You May Need.
You can reach us Toll Free at 1-888-827-3667 for Consumer Assistance or online at www.wayne-dalton.com