


IDRIVE
®
FOR TORQUEMASTER
®
INSTALLATION
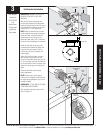
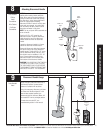
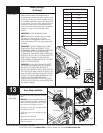
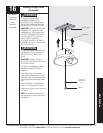
To wind the spring, rotate the winding shaft clockwise,
while watching the mark on the winding shaft (or
socket). Rotate the winding shaft to the required number
of turns for your door or the number recorded during the
Pre-Installation Inspection on page II. Place ratchet pawl
in lower position. Then return to the right hand side and
wind the right hand spring to the required number of
turns or the number recorded during the Pre-Installation
Inspection on page II. Place ratchet pawl in lower
position.
IMPORTANT! DO NOT OVERWIND SPRINGS.
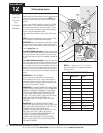
NOTE: Since total turns to balance door can deviate
from spring turn chart values by ± 1/2 turns,
adjustments to the recommended number of spring
turns may be required AFTER rear hangers assembly is
completed.
IMPORTANT! CAUTIOUSLY REMOVE VICE CLAMPS
FROM VERTICAL TRACKS. ADJUSTMENTS TO THE
RECOMMENDED NUMBER OF TURNS MAY BE REQUIRED.
IF DOOR RAISES OFF THE FLOOR UNDER SPRING
TENSION ALONE, THEN REDUCE SPRING TENSION UNTIL
DOOR RESTS ON THE FLOOR. IF THE DOOR IS HARD TO
RAISE OR DRIFTS DOWN ON ITS OWN, THEN ADD
SPRING TENSION. AN UNBALANCED DOOR CAN CAUSE
IDRIVE
®
OPERATION PROBLEMS.
IMPORTANT! IF YOU ARE INSTALLING THE IDRIVE
®
OPENER ON A NEW GARAGE DOOR, REAR SUPPORTS
WILL NEED TO BE FABRICATED/ INSTALLED TO
SUPPORT THE HORIZONTAL TRACKS. REAR SUPPORTS
ARE CONSTRUCTED USING PERFORATED ANGLES, HEX
HEAD BOLTS/NUTS AND THEN THE MUST BE SECURELY
ATTACHED TO SOUND FRAMING MEMBERS WITH LAG
SCREWS. FOR DETAILED INFORMATION ON
CONSTRUCTING/ SUPPORTING THE REAR SUPPORTS,
REFER TO YOUR DOORS INSTALLATION INSTRUCTIONS
AND OWNER’S MANUAL.
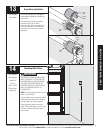
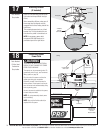
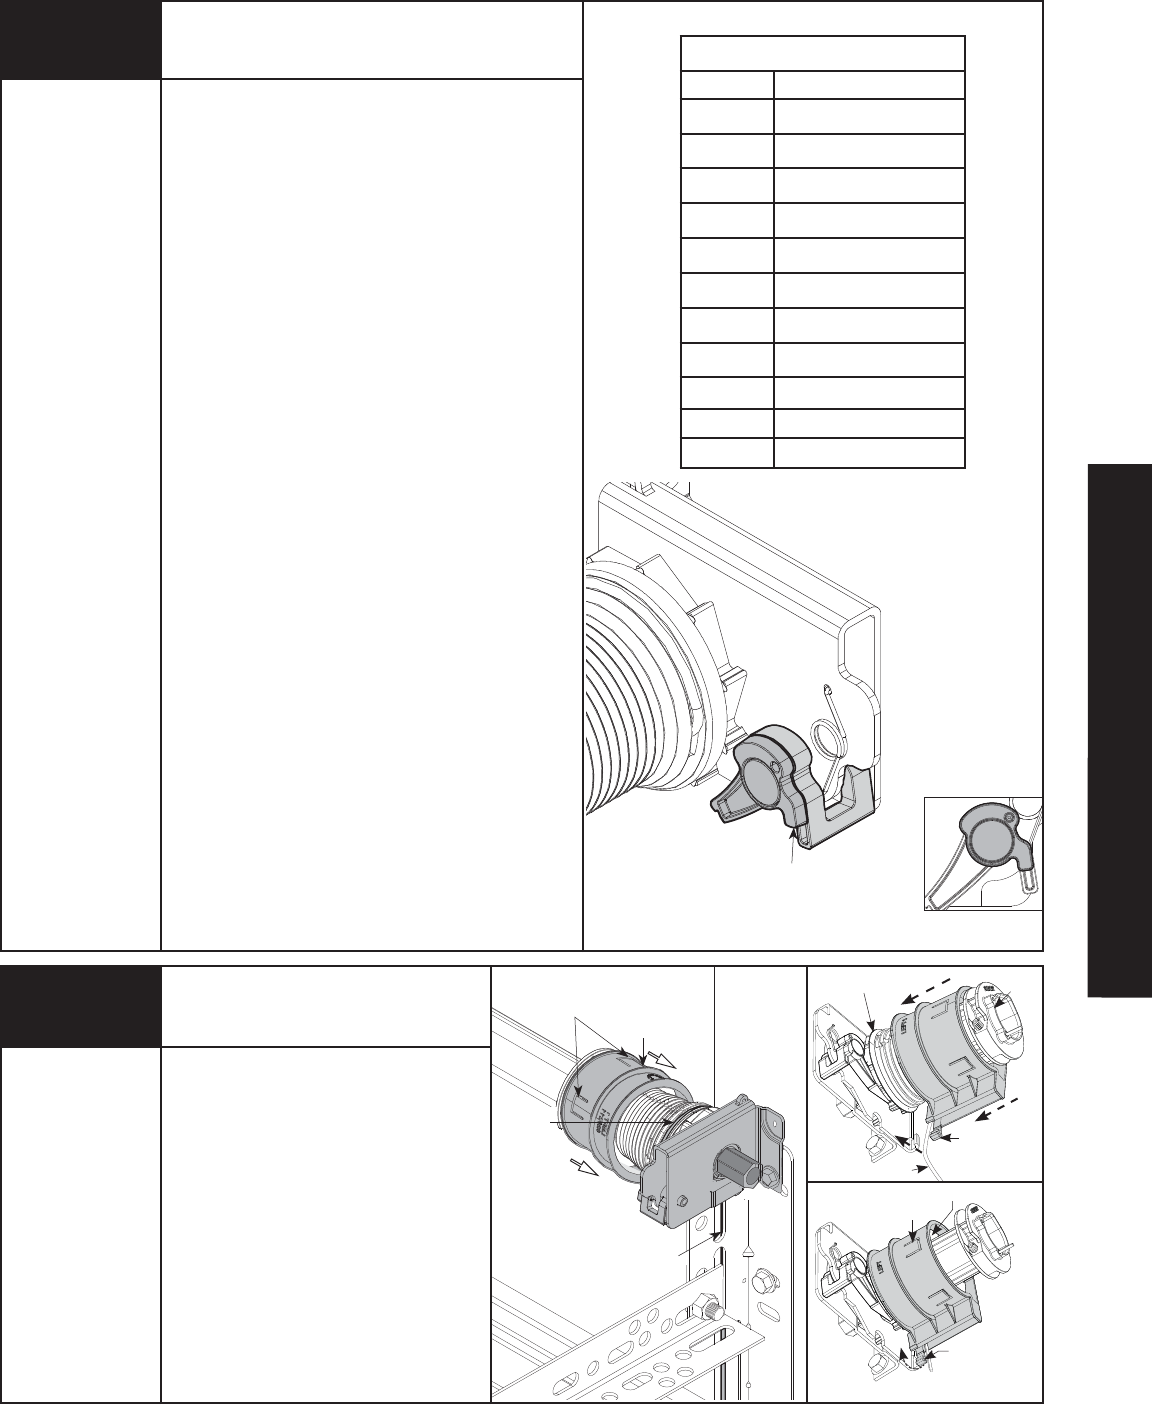
Winding Spring(s)
(Continued)
Pawl Knob In Lower Position
Tools Needed:
Tools Needed:
Step Ladder
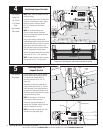
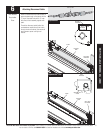
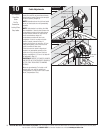
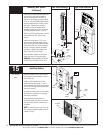
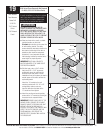
Un-snap the drum wrap hinged latch and rotate
down.
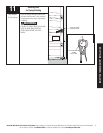
IMPORTANT: Pull the counterbalance cable away
from the header to clear the latch. Simultaneously
slide the drum wrap against the last rib of the
drum until the 3 tabs engage the third rib
Re-engage the hinged latch by rotating upward
until a distinct snap is felt.
Confi rm the catch is fully engaged by lightly
tugging on it.
Repeat for the left hand side.
After completing this Step, continue with
Step 14 on page 21.
Drum Wrap Installation
13
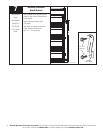
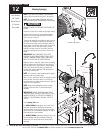
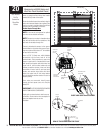
RECOMMENDED SPRING TURNS
Door Height Spring Turns
6’-0” 14
6’-3” 14-1/2
6’-5” 15
6’-6” 15
6’-8” 15-1/2
6’-9” 15-1/2
7’-0” 16
7’-3” 16-1/2
7’-6” 17
7’-9” 17-1/2
8’-0” 18
PAWL KNOB
IN LOWER POSITION
19
Please Do Not Return This Product To The Store. Call Us Directly! Our Trained Technicians Will Answer Your Questions and/or Ship Any Parts You May Need.
You can reach us Toll Free at 1-888-827-3667 for Consumer Assistance or online at www.wayne-dalton.com
Drum Wrap
(Right Hand)
Tabs
Counterbalance Cable
Groove in
Drum
Hinged
Latch
Counterbalance Cable
Pull to clear latch
Last Rib
Drum
Wrap
Left
Cable
Drum
Secure Hinged
Latch
3 Catches
3rd Rib