


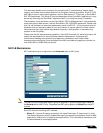

Network > NAT Policies
255
SonicOS Enhanced 4.0 Administrator Guide
• Original Service: Any
• Translated Service: Original
• Inbound Interface: Opt
• Outbound Interface: WAN
• Comment: Enter a short description
• Enable NAT Policy: Checked
• Create a reflective policy: Unchecked
When done, click on the OK button to add and activate the NAT Policy. This policy can be
duplicated for subnets behind the other interfaces of the SonicWALL security appliance – just
replace the Original Source with the subnet behind that interface, adjust the source interface,
and add another NAT policy.
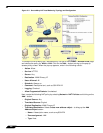
Creating a Many-to-Many NAT Policy
The Many-to-Many NAT policy allows you to translate a group of addresses into a group of
different addresses. This allows the SonicWALL security appliance to utilize several addresses
to perform the dynamic translation. Thus allowing a much higher number of concurrent the
SonicWALL security appliance to perform up to a half-million concurrent connections across
the interfaces.
This policy is easy to set up and activate. You first need to go to the Network > Address
Objects and click on the Add button at the bottom of the screen. When the Add Address
Object window appears, enter in a description for the range in the Name field, choose Range
from the drop-down menu, enter the range of addresses (usually public IP addresses supplied
by your ISP) in the Starting IP Address and Ending IP Address fields, and select WAN as
the zone from the Zone Assignment menu. When done, click on the OK button to create the
range object.
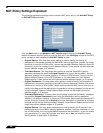
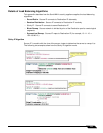
Select Network > NAT Policies and click on the Add button. The Add NAT Policy window is
displayed. To create a NAT policy to allow the systems on the LAN interface to initiate traffic
using the public range addresses, choose the following from the drop-down menus:
• Original Source: LAN Primary Subnet
• Translated Source: public_range
• Original Destination: Any
• Translated Destination: Original
• Original Service: Any
• Translated Service: Original
• Inbound Interface: LAN
• Outbound Interface: WAN
• Comment: Enter a short description
• Enable NAT Policy: Checked
• Create a reflective policy: Unchecked
When done, click on the OK button to add and activate the NAT Policy. With this policy in place,
the SonicWALL security appliance dynamically maps outgoing traffic using the four available
IP addresses in the range we created.