


Network > NAT Policies
254
SonicOS Enhanced 4.0 Administrator Guide
Creating NAT Policies
NAT policies allow you the flexibility to control Network Address Translation based on matching
combinations of Source IP address, Destination IP address, and Destination Services. Policy-
based NAT allows you to deploy different types of NAT simultaneously. This section contains
the following subsections:
• “Creating a Many-to-One NAT Policy” on page 254
• “Creating a Many-to-Many NAT Policy” on page 255
• “Creating a One-to-One NAT Policy for Outbound Traffic” on page 256
• “Creating a One-to-One NAT Policy for Inbound Traffic (Reflective)” on page 257
• “Configuring One-to-Many NAT Load Balancing” on page 257
• “Inbound Port Address Translation via One-to-One NAT Policy” on page 259
• “Inbound Port Address Translation via WAN IP Address” on page 260
• “Using NAT Load Balancing” on page 263
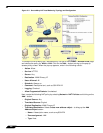
For this chapter, the examples use the following IP addresses as examples to demonstrate the
NAT policy creation and activation. You can use these examples to create NAT policies for your
network, substituting your IP addresses for the examples shown here:
• 192.168.10.0/24 IP subnet on interface LAN
• 67.115.118.64/27 IP subnet on interface WAN
• 192.168.30.0/24 IP subnet on interface Opt
• LAN IP address is 192.168.10.1
• WAN IP address is 67.115.118.68
• Opt ‘Sales’ IP address is 192.168.30.1
• Webserver’s “private” address at 192.168.30.200
• Webserver’s “public” address at 67.115.118.70
• Public IP range addresses of 67.115.118.71 – 67.115.118.74
Creating a Many-to-One NAT Policy
Many-to-One is the most common NAT policy on a SonicWALL security appliance, and allows
you to translate a group of addresses into a single address. Most of the time, this means that
you’re taking an internal “private” IP subnet and translating all outgoing requests into the IP
address of the SonicWALL security appliance WAN port, such that the destination sees the
request as coming from the IP address of the SonicWALL security appliance WAN port, and not
from the internal private IP address.
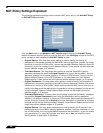
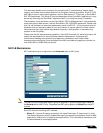
This policy is easy to set up and activate. From the Management Interface, go to the Network
> NAT Policies page and click on the Add button. The Add NAT Policy window is displayed
for adding the policy. To create a NAT policy to allow all systems on the Opt interface to initiate
traffic using the SonicWALL security appliance’s WAN IP address, choose the following from
the drop-down boxes:
• Original Source: Opt Subnet
• Translated Source: WAN Primary IP
• Original Destination: Any
• Translated Destination: Original