USER GUIDE ARENA/ RANGER
33 EN2Z-0906GE51 R0708
2. In User Name, enter the user name.
3. In Password, enter the password.
4. In Password, confirm the password by entering the same password.
NOTE: When creating sites that use incoming connections, It is strongly
recommended to change the password of default user names such
as manager, keeper, etc. which by default reads the same as the
user name.
5. In Role, select the role for the user.
6. In Comment, enter a comment if desired.
7. Under Access Restrictions, select from:
No access restrictions
The user has access to all sites on which he already exists and which are
displayed in the site tree including remote ARENAs. When a new site is created,
the user will automatically have access to it.
Grant access only to
The user has restricted access, that is, the user can access only particular sites.
In the list below, all sites are displayed that are known on the site selected in the
tree. These sites can be:
• Local sites
• Remote sites via iLON 10
• Remote ARENAs
Sites to which the user has no access are disabled (gray). When the user
administration is invoked for a remote ARENA selected in the tree, the users will
be administered for that site. Then the sites of the remote ARENA are listed
here.
8. In the list below, select the site(s) which the user should have access to by
clicking the corresponding checkbox(es).
9. To allow the user (with or without restrictions) entering a remote site without
entering user name and password again (Auto-Logon User), click the Edit
button.
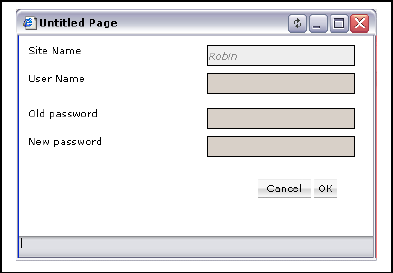
10. In the password dialog, enter the user name and password for the user. If a
password has been issued once, enter it in Old password. In New password,
enter a new password.
NOTES: Auto-Logon users can be created only for connections to remote
ARENA sites. The user must exist on the remote site and user
name and password must match the entries you enter here.
11. In the password dialog, click OK button. The user is created and displayed as
Auto-Logon user in the column of the same name.
