


Quick Start
Introduction 2
2-3
Introduction
This section briefly explains the basics of setting up and operating your thermo-
hygrometer.
Unpacking
Carefully unpack the thermo-hygrometer and inspect the instrument to make sure all
components are present and in satisfactory condition. Verify that the following items are
present:
• 5020A Thermo-Hygrometer
• AC adapter and power cord
• Serial cable
• Getting Started Manual
• CD-ROM with complete Users Manual
• Report of calibration
• Wall mount bracket
• Sensor
• 9V battery
If all items are not present, call your Fluke Authorized Service Center.
Use Proper Care
First and most important is to understand the safety issues related to the thermo-
hygrometer. Carefully read Safety Information.
The thermo-hygrometer and sensors used with it are sensitive instruments that can be
easily damaged. Always handle these devices with care. DO NOT allow them to be
dropped, struck, stressed, or over-heated.
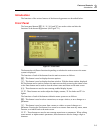
Learn About the Features and Components
Familiarize yourself with the features and accessories of the thermo-hygrometer by
reading Parts and Controls.
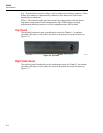
Install the Battery
To maintain uninterrupted measurement when power outages occur, you must install the
included battery into the rear battery compartment. A standard 9V alkaline battery
(NEDA 1604A or IEC 6LR61) is recommended. With a fresh alkaline battery installed,
the thermo-hygrometer will continue to measure and record temperature and relative
humidity during a power outage for up to 16 hours, typically. However, without external
power, the display will be inoperable.
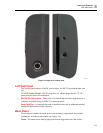
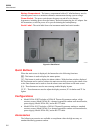
Connect the Sensor
The sensor for channel 1 connects to the socket at the top-right, and the sensor for
channel 2, if used, connects to the socket on the right side. Either sensor may be used
with an optional extension cable up to 100 feet (30 meters) in length.