


Chapter 6 Scenario: DMZ Configuration
Configuring the Security Appliance for a DMZ Deployment
6-16
Cisco ASA 5500 Series Adaptive Security Appliance Getting Started Guide
78-17611-01
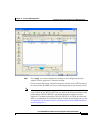
For many configurations, you would also need to create a NAT rule between the
inside interface and the outside interface to enable inside clients to communicate
with the Internet.
However, in this scenario you do not need to create this rule explicitly. The reason
is that the IP pool (pool ID 200) contains both types of addresses needed for
address translation: the range of IP addresses to be used by the DMZ interface,
and the IP address to be used for the outside interface. This enables ASDM to
create the second translation rule for you.
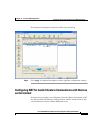
Configuring an External Identity for the DMZ Web Server
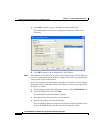
The DMZ web server needs to be accessible by all hosts on the Internet. This
configuration requires translating the private IP address of the DMZ web server
to a public IP address, enabling access to outside HTTP clients that are unaware
of the adaptive security appliance. To map the real web server IP address
(10.30.30.30) statically to a public IP address (209.165.200.226), perform the
following steps:
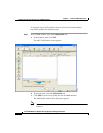
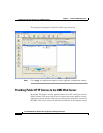
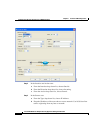
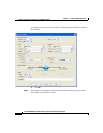
Step 1 In the ASDM window, click the Configuration tool.
Step 2 In the Features pane, click NAT.
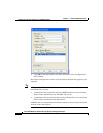
Step 3 From the Add drop-down list, choose Add Static NAT Rule. The Add Static NAT
Rule dialog box appears.
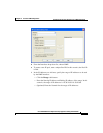
Step 4 In the Real Address area, specify the real IP address of the web server:
a. From the Interface drop-down list, choose the DMZ interface.
b. Enter the real IP address of the DMZ web server. In this scenario, the IP
address is 10.30.30.30.
c. From the Netmask drop-down list, choose the Netmask 255.255.255.255.