


Please Do Not Return This Product To The Store. Contact your local Wayne-Dalton dealer. To find your local Wayne-Dalton dealer, refer to your local
yellow pages business listings or go to the Find a Dealer section online at www.Wayne-Dalton.com
32
Tools Needed:
Tools Needed:
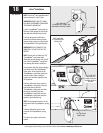
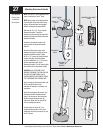
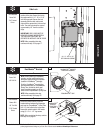
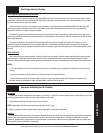
See chart in Step 31 for proper spring tension
setting. Beginning with the right hand side,
ensure the cable is in the first groove of the
cable drum. Apply light pressure to the canoe
clip on counter cover while winding springs.
PRIOR TO WINDING OR MAKING ADJUSTMENTS
TO THE SPRINGS, ENSURE YOU’RE WINDING IN
THE PROPER DIRECTION AS STATED IN THE
INSTALLATION INSTRUCTIONS. OTHERWISE THE
SPRING FITTINGS MAY RELEASE FROM SPRING
IF NOT WOUND IN THE PROPER DIRECTION AND
COULD RESULT IN SEVERE OR FATAL INJURY.
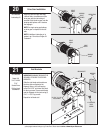
Using a power drill (high torque/gear reduced
to 1300 RPM preferred) with a 7/16" socket,
carefully rotate right hand winding bolt
clockwise, until counter
shows 2-3 turns.
This will keep the counterbalance cable taut
while adjusting the left hand side
counterbalance cable. Adjust left hand
counterbalance cable tension. (refer to Step 29)
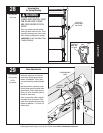
NOTE: Single spring applications require no
spring winding on left hand side, but need
cable tension adjusted.
NOTE: Ensure counterbalance cable tension is
equal for both sides prior to fully winding
spring(s) to appropriate number of turns. If
cable tension is unequal refer to Step 29.
Winding Bolt Rotation
CANOE CLIP
WINDING
BOLT
Power Drill
7/16" Socket
Driver
Power Drill
7/16” Socket
Driver
7/16" Wrench
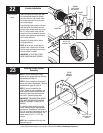
30
31
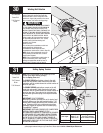
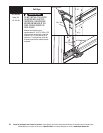
NOTE: Apply light pressure to the canoe clip on the
counter cover while winding spring(s).
See the Spring Turn chart.
For SINGLE SPRING applications, return to the right
hand side and carefully rotate the winding bolt head
clockwise until the counter shows the correct number of
turns for your door.
For DOUBLE SPRING applications, remain on the left
hand side and carefully rotate the winding bolt head
clockwise until the counter shows the correct number of
turns for your door. Then return to the right hand side
and wind the right hand spring to the required number
of turns.
IMPORTANT: DO NOT OVERWIND.
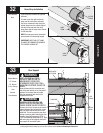
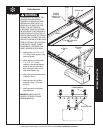
After spring is wound, hold the lock nut (in back of end
bracket) stationary on the right hand side with a 7/16”
wrench while rotating the winding bolt clockwise until
snug. Tightening of the lock nut prevents spring from
unwinding. Repeat for opposite side for double spring
TorqueMaster
®
systems
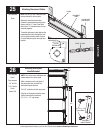
IMPORTANT: CAUTIOUSLY REMOVE VICE CLAMPS FROM
VERTICAL TRACKS. ADJUSTMENTS TO THE
RECOMMENDED NUMBER OF TURNS MAY BE REQUIRED.
IF DOOR RAISES OFF FLOOR UNDER SPRING TENSION
ALONE, REDUCE SPRING TENSION UNTIL DOOR RESTS
ON THE FLOOR. IF THE DOOR IS HARD TO RAISE OR
DRIFTS DOWN ON ITS OWN, ADD SPRING TENSION. AN
UNBALANCED DOOR SUCH AS THIS CAN CAUSE IDRIVE
®
OPERATION PROBLEMS.
Setting Spring Tension
15.5
SPRING
TENSION
SAMPLE
SETTING
7/16”
WRENCH
LOCK NUT
RECOMMENDED SPRING TURNS
Door Height
idrive
®
Operated
Doors 11’-11”
Wide or Less
Manually Operated Door,
and idrive
®
Operated
Doors 12’ Wide or Greater
8’-0” 17-1/2 18
WARNING