


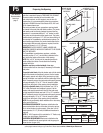
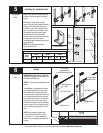


Tools Needed:
Please Do Not Return This Product To The Store. Contact your local Wayne-Dalton dealer. To find your local Wayne-Dalton dealer, refer to your local
yellow pages business listings or go to the Find a Dealer section online at www.Wayne-Dalton.com
18
11
Power Drill
7/16” Socket
Driver
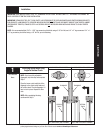
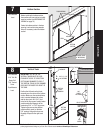
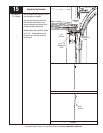
Operator Bracket
NOTE: If installing a trolley type
operator, complete this step. If not, skip
this step and continue with step 12.
IMPORTANT: WHEN INSTALLING A
TROLLEY TYPE OPERATOR ON 9800
DOOR, A WAYNE-DALTON TROLLEY
BRACKET MUST BE SECURELY
ATTACHED TO THE TOP SECTION. IT
IS THEN UNNECESSARY TO FURTHER
REINFORCE THE TOP SECTION OF
THE MODEL 9800 WAYNE-DALTON
DOOR, WHEN ATTACHING A TROLLEY
TYPE OPERATOR, AS LONG AS THE
INSTALLATION OF THE OPERATOR
IS ACCORDING TO INSTALLATION
INSTRUCTIONS AND OWNER’S MANUAL
AND FORCE SETTINGS ARE ADJUSTED
PROPERLY.
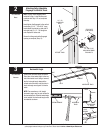
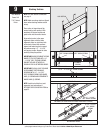
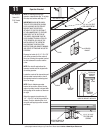
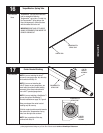
Remove, but retain (4-6) 1/4”-20 x 7/8”
self drilling screws from the center of
the u-bar, allowing the operator bracket
to slide between the section and the
u-bar.
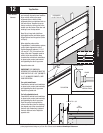
NOTE: For retro fit applications, the
operator bracket must be aligned with
an existing operator
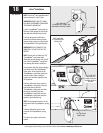
Locate the center of the top section and
slide operator bracket under u-bar till
the operator bracket is seated against
the u-bar flange.
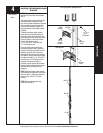
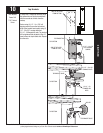
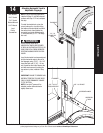
NOTE: Prior to fastening operator
bracket to top section, ensure the top
edge of operator bracket is aligned with
the top edge of the section as shown on
far right.
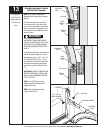
Attach the operator bracket using (6)
1/4” – 20 x 5/8” self drilling screws (as
shown). Finish re-attaching the u-bar
using the self tapping screws removed
previously.
OPERATOR
BRACKET
OPERATOR
BRACKET
U-BAR
U-BAR
1/4”-20 X 7/8” SELF
DRILLING SCREWS
SIDE VIEW OF U-BAR
U-BAR
OPERATOR BRACKET IN
PLACE UNDER U-BAR
( 6) 1/4”-20 X 5/8”
SELF DRILLING
SCREWS
SIDE VIEW OF U-BAR WITH
OPERATOR BRACKET INSTALLED
OPERATOR
BRACKET
U-BAR
TOP OF SECTION
TOP EDGE OF
OPERATOR
BRACKET