29
VFR-400 • 5403548 • REV D • 10/07
NL
H
OT - B
L
A
C
K
NEUTRAL- WHITE
E
AR
T
H
GR
O
UND- G
R
E
E
N
O
U
T
P
U
T
1
B
AT+
ASS
Y
D
I
OD
E
EO
L
RED
BLACK
N
O
C
OMNC
NC
N
ON
O
N
O
C
O
MC
O
M
C
O
M
BLACK
RED
5
.
1K
EOLR
BLACK
RED
E
OL
R
5.
1K
BLACK
RED
RE
LE
ASE
ALARM
G
E
NE
R
AL
SOL
E
NOI
D
Z
O
N
E
4
RELEASE
STAT
I
O
N
WAT
ER
FLOW
ZO
N
E
3
SWI
TCH
ZO
N
E2ZONE
1
DETEC
T
ION
C
O
N
VE
NTI
ON
A
L
SUP2
SUP 1
D
RY CO
N
TA
CT
SR
A
TED A
T
3A, 3
0
V
D
C
T
RO
U
B
LE SU
PV
R
ELA
Y
CO
N
TAC
TS
ALARM
E
OLR
5.1K
T
R
O
U
B
L
E
B
E
L
L
S
UPERVISOR
Y
BE
L
L
A
U
X
.P
O
WER
RS-
4
8
5
2
4
V
N
RD
C
1
2
0OHM
VA
LV
E
TAM
PER
S
U
PE
R
V
I
S
O
RY
L
OW AIR
P
RE
SS
U
R
E
SU
P
ER
VI
SO
RY
S
W
I
TC
H
0
9
47
3
LOW
A
IR
PR
E
S
S
UR
E
AL
A
RM
S
WITCH
0
947
3
24
V
R
D
C
WTR
F
LW
0
94
7
0
Z
ONE 1
ZON
E
2
ZONE 3
Z
O
N
E4
OUT
PUT
1
O
UTPUT
2
O
U
TPUT
3
O
UT
PU
T
4
PR
O
G
R
A
M
MODE
RU
N
MODE
A
C
PO
W
E
R
PO
W
ER
T
B
L
SYSTE
MT
BL
S
U
P
TB
L
GRO
U
N
D
FA
U
LT
SUPE
R
VI
S
ORY
2
C
O
M
M
ON
A
LA
RM
A
LA
R
MS
I
LEN
CE
S
T
EAD
Y
:D
I
SCH
A
R
GE
D
F
LASHING
:PRE-
DI
S
C
HAR
GE
RUN
P
R
OGRAM
S
ET
S
E
LE
C
T
F
U
NC
T
I
ON
SC
RO
LL
-
D
OW
N
BU
Z
ZE
R
SIL
ENCE
S
IG
NAL
S
I
L
E
N
C
E
S
Y
ST
E
MR
E
SE
T
SCR
O
L
L
-
UP
BUZ
Z
ER SILENCE
VI
EW
I
NG
ANG
LE
V
F
R
-4
0
0
EOLR
5.1K
EOLR
5.1
K
EOLR
5
.
1K
EOLR
5.1K
E
O
L
R
5.1
K
B
A
T-
O
UT
P
U
T
2
OUTPUT3
O
U
T
PU
T4
MANU
A
L
Z
ON
E
1
EO
LR
5
.
1
K
BLACK
RED
SUPE
R
VI
S
ORY
1
}
LAMP TEST
DWG# 14168 VKG PRGM5
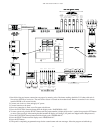
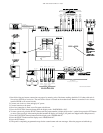
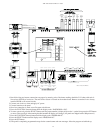
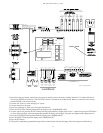
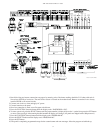
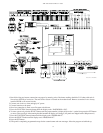
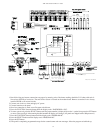
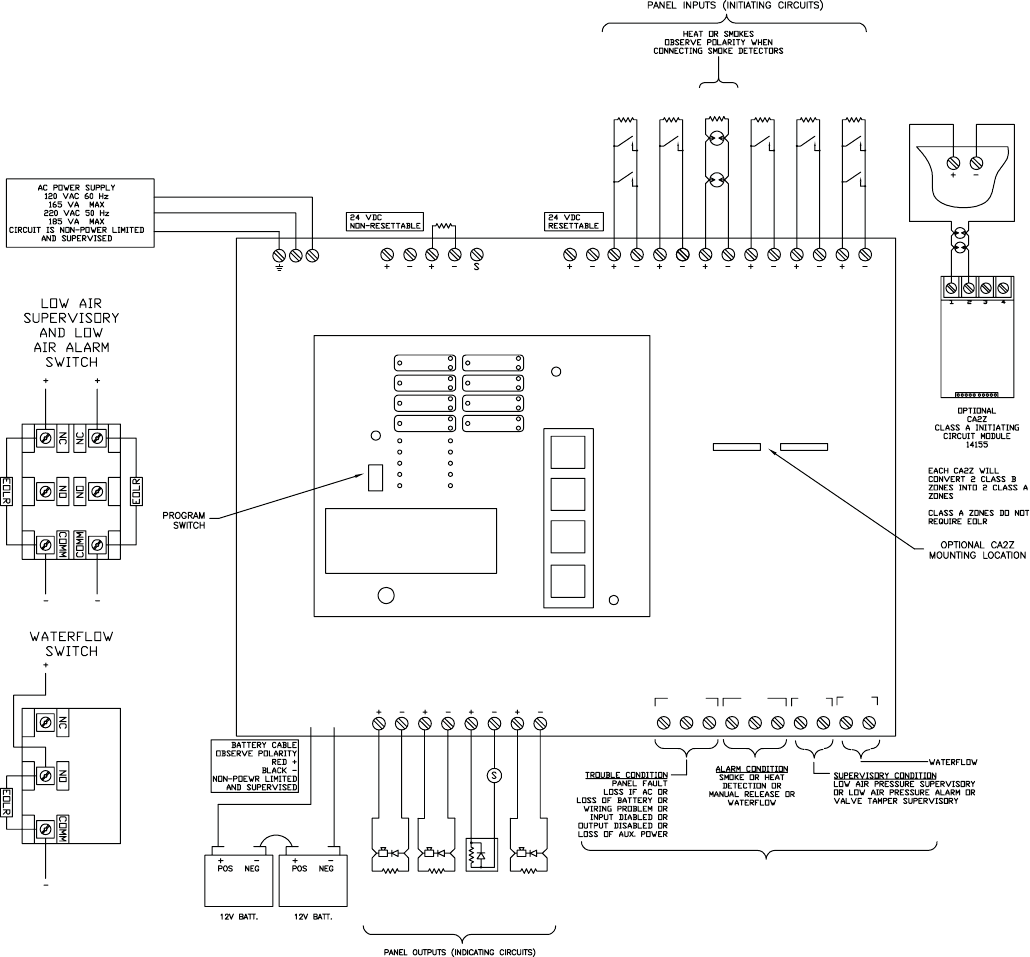
1. Run fi eld wiring and ensure connections are proper by metering wires. Resistance reading should be 5.1K ohms with end-of-
line resistor (EOLR) at last device. The end-of-line resistor is located on the mother board. Remove as needed. Leave factory
installed EOLR on all unused circuits.
2. Connect one circuit at a time and apply AC power.
3. Connect batteries to the panel.
4. Once last connection is made, move Program switch down.
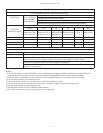
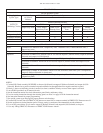
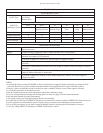
5. Press the FUNCTION (bottom) button until the display reads “PASSWORD = 000”.
6. To enter a password, press the SELECT button until the proper number is displayed above the ^ symbol, then press the SET button
to move to the next digit. After entering the third number the display will change. (All panels are shipped with a 000 password.)
7. Press the FUNCTION (bottom) button until the display reads “PROGRAM #5”.
8. Press the SELECT button until the display reads “PROGRAM #5”.
9. Press the SET button.
10. The panel is completely programmed except for the custom banner and zone messages. Move the program switch back up.


