


Pro Sweep
Page 4 -- 18
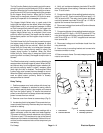
Electrical System
Service and Repairs
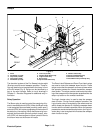
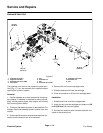
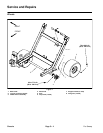
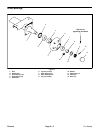
Solenoid Valve Coil
1. Solenoid valve (SV1)
2. Hydraulic manifold
3. Solenoid relief valve (SRV)
4. Coil spacer
5. Nut
6. Solenoid coil
7. Nut
8. Solenoid valve (SV2)
9. Solenoid valve (SV3)
10. Solenoid coil
11. Nut
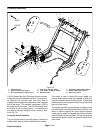
Figure 17
2
3
6
8
9
10
11
1
5
4
6
7
FRONT
UP
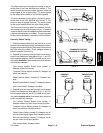
60 in--lb
(6.8 N--m)
60 in--lb
(6.8 N--m)
60 in--lb
(6.8 N--m)
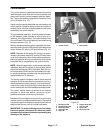
The solenoid valve coils on the hydraulic control man-
ifold (Fig. 17) can be removed and installed without
opening the hydraulic system.
Removal
1. Position sweeper on a level surface with dump hop-
per lowered. If sweeper is attached to towing vehicle,
apply vehicle parking brake, stop engine and remove
key from the ignition switch.
2. To ensure that electrical power is removed from Pro
Sweep, disconnect sweeper power harness from tow
vehicle.
3. Disconnect the machine wire harness electrical con-
nector from the solenoid coil to be removed.
4. Remove the nut from the cartridge valve.
5. Slide the solenoid coil from the cartridge.
6. Clean all corrosion or dirt from the cartridge stem.
Installation
1. Slide s olenoid coil onto the cartridge stem.
2. Install the nut onto the cartridge and torque nut 60
in--lb (6.8 N--m) (do not over tighten).
3. Connect the machine wire harness electrical con-
nector to the solenoid coil.