R-5627 Page 25
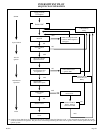
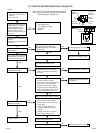
STANDING PILOT-TROUBLE SHOOTING
With proper installation and maintenance, your new Gas Direct Vent Fireplace should provide years of trouble-free service. If you do experience
a problem, refer to the Trouble Shooting Guide below. This guide will assist a qualified service person in the diagnosis of problems and the
corrective action to be taken.
1. Spark ignitor will not light pilot after repeated triggering of
piezo ignitor button.
a. Defective ignitor (no spark electrode)
—Check for spark at electrode and pilot; if no spark and electrode
wire is properly connected, replace ignitor.
b. No gas or low gas pressure.
—Check remote shut off valves from fireplace. Usually there is
a valve near the main. There can be more than one (1) valve
between the fireplace and main.
—Low pressure can be caused by a variety of situations such as
a bent line, too narrow diameter of pipe, or low line pressure.
Consult with plumber or gas supplier.
c. No LP in tank.
—Check LP (propane) tank. Refill tank.
2. Pilot will not stay lit after carefully following lighting instructions.
a. Defective thermocouple.
—Check that pilot flame impinges on thermocouple. Clean and/
or adjust pilot for maximum flame impingement.
—Ensure the thermocouple connection at the gas valve is fully
inserted and tight (hand tight plus 1/4 turn). Faulty thermocouple
if reading is below specified minimum of 15 millivolts.
—Disconnect the thermocouple from the valve, place one millivolt
meter lead wire on the end of the thermocouple and the other
millivolt meter lead wire on the thermocouple copper wire. Start
the pilot and hold the valve knob in. If the millivolt reading is less
than 15 millivolt, replace the thermocouple.
b. Defective valve.
—If thermocouple is producing more than 15 millivolts, replace
faulty valve.
3. Pilot burning, no gas to burner, valve knob "ON", on/off switch
"ON."
a. "On/Off" switch, wall switch, remote control or wires defective.
—Check "on/off" switch and wires for proper connections. Place
jumper wires across terminal at switch - if burner comes on,
replace defective switch. If OK, place jumper wires across switch
wires at gas valve-if burner comes on, wires are faulty or
connections are bad.
b. Thermopile may not be generating sufficient millivolts.
—If the pilot flame is not close enough physically to the
thermopile, adjust the pilot flame.
—Be sure the wire connections from the thermopile at the gas
valve terminals are tight and the thermopile is fully inserted into
the pilot bracket.
—Check the thermopile with a millivolt meter. Take the reading
at TH-TP & TP terminals of the gas valve. The meter should read
350 millivolts minimum, while holding the valve knob depressed
in the PILOT position, with the pilot lit, and the ON/OFF switch
in the OFF position. Replace the faulty thermopile if the reading
is below the specified minimum.
c. Cotter pin disconnected from delayed ignition reset switch.
—Refer to page 23 for description of delayed ignition reset
switch and replacement of cotter pin into delayed ignition reset
switch.
—With the pilot in the ON position, disconnect the thermopile
leads from the valve. Take a reading at the thermopile leads. The
reading should be 350 millivolts minimum. Replace the thermopile
if the reading is below the minimum.
d. Defective valve.
—Turn valve knob to "ON." Place ON/OFF switch to "ON."
Check with millivolt meter at thermopile terminals. Millivolt
meter should read greater than 200 millivolts. If the reading is
okay and the main burner does not ignite, replace the gas valve.
e. Plugged main burner orifice.
—Check main burner orifice for blockage and remove.
4. Frequent pilot outage problem.
a. Pilot flame may be too high or too low, or blowing (high), causing
pilot safety to drop out.
—Clean and adjust flame for maximum flame impingement on
the thermocouple. Follow lighting instructions carefully.
5. The pilot and main burner extinguish while in operation.
a. No LP (Propane) in tank.
Check LP (Propane) tank. Refill fuel tank.
b. Inner vent pipe leaking exhaust gases back into system
—Check for leaks.
c. Glass too loose, gasket leaks in corners after usage.
—Be certain glass assembly is installed correctly and tighten
screws.
d. Horizontal vent improperly pitched.
—The horizontal vent cap should slope down only enough to
prevent any water from entering the unit. The maximum
downwards slope is 1/4 inch.
e. Bad thermopile or thermocouple.
—Replace if necessary.
f. Improper vent cap installation.
—Check for proper installation and freedom from debris or
blockage.
6. Glass soots.
a. Flame impingement on logs.
—Contact Empire Comfort Systems, Inc.
b. Debris around throat of main burner.
—Inspect the opening at the base of the main burner. It is
imperative that
NO material be placed in this opening.
7. Flame burns blue and lifts off main burner.
a. Insufficient oxygen being supplied.
—Check to make sure vent cap is installed properly and free of
debris. Make sure that vent system joints are tight and have no
leaks.
—Check to make sure that no material has been placed at the
main burner base.
—Be sure glass is tightened properly on unit, particularly on top
corners.


