


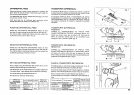

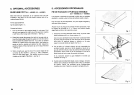

5. OPTIONAL ACCESSORIES
BLIND HEM FOOT (o.s-#J50882)(1.0- #J50883)
Blind hem feet are obtainable as an optional extra and are
available in two sizes. 0.5 for fine-medium fabrics and 1.0 for
medium/heavy fabrics.
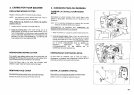
Fit the appropriate foot.
Set the stitch length 4 - 5.
Proceed as follows:
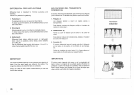
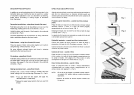
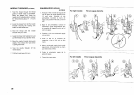
1. Turn up the hem to the required depth (1) and press. Fold
the hem back against the 'right' side of the garment, creating
a 'soft'.fo!d nn th_ 'wrnng' side of the fabric - see Fig. 1.
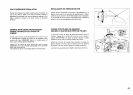
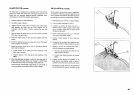
2. Place fabric under the presser foot with the 'wrong' side up.
Feed the folded edge through the guide (3) in the front of the
foot and lower the presser foot lever. Try a stitch (or several
stitches) on a spare piece of the actual fabric, and adjust the
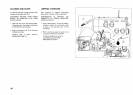
guide so that the needle just catches the fold. Adjust the
guide by means of the small screw (2) on the top of the foot
- see Fig. 2.
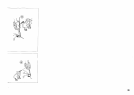
3. When correctly set, sew the hem. The outside edge will be
cut away by the machine - see Fig. 2. After completion,
open out and press again. The stitches should be almost
invisible on the 'right' of the fabric - see Fig. 3.
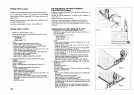
5. ACCESORIOS OPCIONALES
PIE DE PLEGADO O PUNTADA INVISIBLE
(0.5 - #J50882) (1.0 - #J50883)
Los pliegues o doblados de puntada invisible dan un acabado
duradero e invisible y ahorra horas de tedioso cosido a mano.
Hay dos tipos de pies disponibles, uno para tejidos delgados y
otro para tejidos gruesos.
Acoplar el pie de pliegue de puntada invisible apropiado y fijar
la Iongitud de puntada en 4 - 5. Hacer una prueba usando
algt_n tejido similar al de la prenda a coser.
Colocando el reverso del tejido hacia arriba, et primar doble
puede reatizarse a 65 mm. como m&ximo (1).
Con el reverso del tejido hacia arriba hacer cuidadosamente
el primer pliegue trayendo el resto del tejido de laizquierda
para hacer un segundo pliegue o doblado en la parte
superior cerca del borde del tejido (Ver Fig. 1).
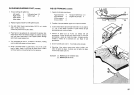
Con el tejido asi, colocarlo debajo del pie prensatelas de
puntada invisible, avanzar el borde plegado a trav_s de la
guia (3) enfrente del pie y bajar la palanca elevadora del pie
prensatelas. Ahora coser un par de puntadas. El hilo de la
aguja izquierda ha de coger la esquina dei pliegue.
Si es necesario ajustar la guia mediante el tornillo (2)
mostrado en la Fig. 2.
3. Cuando este correctamente fijado, coser el pliegue, el borde
exterior sera. cortado por la m&quina (ver la Fig. 2). Despu_s
de coserlo, abrirlo, las puntadas sedan practicamente
invisibles en el lado "derecho o anverso" del tejido (Fig. 3).
Fig, 1
Fig. 2
Fig. 3
34