


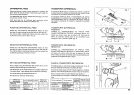


ADJUSTING STITCH LENGTH
Turn the stitch length dial (1) to desired stitch
length.
The higher the number, the longer the stitch.
This dial can adjust the stitch length from 1 to
5 mm.
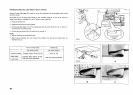
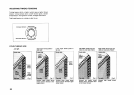
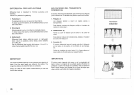
ADJUSTING OVEREDGE
CUTTING WIDTH
Overedge cutting width can be adjusted from
4 to 7 mm by simply turning overedge cutting
width dial (2) according to the kind of fabric,
It is set at standard width of 6 mm when
delivered fromthe factory.
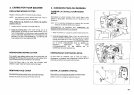
Turn it towards "4" if fabric edge curls while
sewing. (Fig. 1)
Turn it towards "6" if loopshang off the edge.
(Fig. 2)
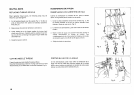
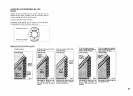
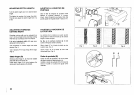
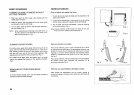
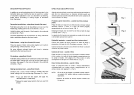
Stitch finger (B)
Remove stitch finger A (3) from the needle
plate with the screw driver (4).
Install stitch finger B (5) firmly between the
spring and needle plate as illustrated.
AJUSTAR LA LONGITUD DE
PUNTADA
Girar el dial de Iongitud de puntada hasta
obtener la puntada deseada. A numero
mayor, mayor longitud de puntadas. Este dial
puede ajustar la Iongitud desde 1 hasta 5 mm.
AJUSTARLAANCHURA DE
LACOSTURA
La anchura de la costura se puede ajustar
s61o girando el dial de anchura (2) de costura
segQn la clase de tejido.
Se fija en la anchura normal de 6 mm
cuando entregado desde la fabrica.
Girarlo hasta "4" si el borde de tejido se riza
cuando cose. (Fig. t)
Girarlo hasta "6" si la forma de lazo esta
demasiada floja. (Fig. 2)
Dedo de puntada (B)
Quitar el dedo de puntada A (3) de la ptaca
de aguja usando el destornillador (4).
Instalar el dedo de puntada B (5) firmamente
entre el muelle y la placa de aguja como
ilustrado.
Fig. 1 Fig. 2 Fig. 3
i! ii:i :i::iiiiiiiiiiiiii!i::_
Fig. 4
B
l
A
24